Tuesday, January 29, 2013

Powder Room: Creating Marble Cabinet Toppers


In my last post, I shared how we updated our powder room fixtures and storage to create a stylish, yet budget-friendly and functional space.
We solved the powder room's storage issues by re-imagining door-front nightstands (purchased at a moving sale).  Initially, we topped the cabinets with place mats and installed them alongside the pedestal-style sink.  This worked well enough that I forgot about my goal of replacing the pedestal sink and was overall happy with our powder room's functionality.

That was nearly two years ago.  And, after all those months of use, the bamboo place mats are not holding up.  Water marks and toothpaste were mucking up the bamboo surface (Got kids?  I do).  Not only was this hard to clean, but it was also icky to look at.  Time to address the cabinet tops.
Water and toothpaste stains on the bamboo
Marble Cabinet Tops:
I have wanted to incorporate some tile into this powder room forever.  The cabinet tops, which measure about 15" x 15", were an obvious location for tile - especially since we are most likely keeping the pedestal sink.  Two summers ago, we made a tile topper to hide a built in planter box.  I thought we could mimic the design for the cabinets in the powder room.  However, I want nothing to do with cleaning the grout lines.  So, pretty glass mosaic and Travertine were out.  I considered using large-scale porcelain or ceramic tiles.  But, after a trip to the home improvement store, nothing had the right look.
This past week, I finally came up with a solution:  One single tile of Carrera Marble.  This classic material is a natural stone, timeless, and would absolutely enhance the look of the powder room.  Because I did not need much, I hoped the cost would not be a stopper.  It was not!  I stopped in at my local tile outlet store and perused the aisles.  The selection and variety was fabulous - I purchased two 18" x 18" Carrera Bianco Marble tiles and headed home to share my idea with my husband.   We spent our lunch hour making the cabinet toppers.  Here's how we did it:

Materials:


General How To:

  • Measure the surface to which you want to add the topper.
    Note:  Each cabinet top measured 15 1/4" x 15 1/4".
  • Select a tile that is as large or larger than the cabinet top.
    Note:  Any solid surface would work.  I chose the Carrera marble because I love its timeless look.

18" x 18" Carrera Bianco Marble Tile

  • If the tile is larger than the cabinet top, use a tape measure to mark the desired dimensions on the tile.
    Note:  My husband handled this part.


  • Use a T-Square to confirm and mark the cut line.
    Note:   We confirmed that, with marble, you can mark and make your cuts along the finished side of the tile.

Use T-Square to ensure lines are straight and level. 

  • Use a wet saw to trim tile to desired dimensions.

The wet saw makes cutting marble very easy!

  • Repeat with other tile.
    Result:  You created two cabinet tops.
  • Measure two pieces of felt that are slighly smaller than the tile dimensions.
    Note:  I cut two pieces at about 14 3/4" x 14 3/4".

Cut two pieces of felt slightly smaller than the tile.

  • Use spray adhesive to attach the tile squares to the bottom side of each tile cabinet topper.

Spray the tile, place felt and smooth out wrinkles.

  • Repeat with second tile.
    Result:  You completed the cabinet toppers.
  • Place the marble cabinet toppers and check dimensions.
    Note:  We placed the toppers so that the cut edges would face the back and side wall when installed in powder room. 

Completed Cabinet toppers
Once I placed them back into the powder room, I knew I made a great decision.
New cabinet tops installed.
The marble looks great.  Combined, the two tiles cost under $15.00.  The felt was left over from of my daughter's school projects.  And, because no grout was needed, the entire project was completed in under one hour.  Not only are my new marble cabinet tops decorative, but they are also durable enough to stand up to the kids' spills and regular cleaning.


Powder Room: Updating Fixtures and Storage

Updated Powder Room
Like most things in our 20-something year old home,  the powder room fixtures were original.  While they functioned well enough, the ornate brass finishes needed refreshing.  We knew we wanted to update sooner than later.  So, while I agreed to live with the pedestal sink until a better solution presented itself, I insisted we update the fixtures.  We also addressed the lack of storage in the powder room.  Keep reading to see how we updated the powder room - keeping form, function, and budget in mind.

Fixtures:  
Pretty soon after settling in, we updated the the following powder room fixtures:
  • Faucet
  • Towel Ring
  • Vanity Lighting
  • Mirror
  • Toilet Trip Lever / Seat
  • Toilet Paper Holder
  • Door Hardware
Faucet:  For consistency throughout the house, we chose a faucet with a satin nickel finish.  We measured to confirm the fixture fit the pedestal sink's pre-drilled, 8-inch widespread faucet holes.  Before heading out to the store, I snapped a picture of the vanity specifications.  I referred to it a few times as I perused the huge wall-o-faucets at the home improvement store.
Note:  Read more about faucet sizes on Dimensions Info's web site.
Replaced brass faucet with updated, satin nickel faucet
Towel Ring:  Bathroom fixtures are pretty straightforward.  The small-scaled nature of powder rooms, however, always seems to invite a debate regarding hand towel placement.  Should we hang the towel on a bar, ring, or hook?  Or should it just sit on the counter?
Because our powder room featured a pedestal sink and existing towel ring, the debate ended pretty quickly.  We sent the brass-finished, open-rectangle towel ring to the local charity donation center and replaced it with a towel ring in a satin nickel finish.  Lucky us, we hit a clearance sale and paid less than ten dollars for the towel ring.
Hand towel hangs from towel ring
Vanity Lighting and Mirror:  In the past, we've saved renovation dollars by updating existing mirror frames and light fixtures with spray paint.  This time around, we agreed that the ornate molding on the mirror was just not our taste, so we left it as is and donated it.  The light fixture met the same fate.
Original bathroom decor on way to donation center drop-off
We purchased new lighting and a mirror at the home improvement store.  Because we used the existing wiring, the vanity light installation went smoothly.
Note:  Take a look at my post from our basement bathroom update to learn more about installing a vanity light where one does not already exist.
New mirror and vanity light installed
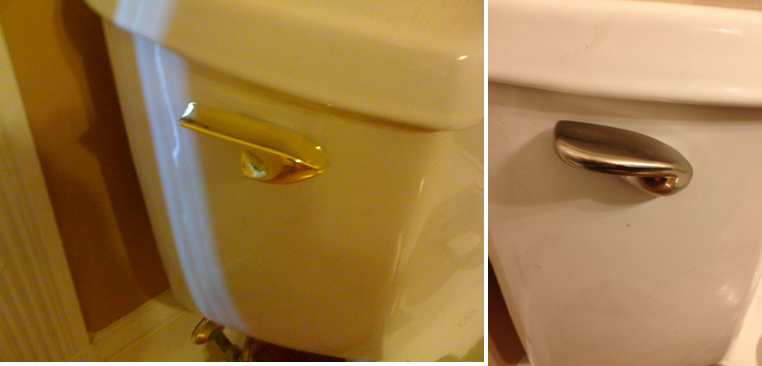
Toilet Seat / Trip Lever:  Replacing the toilet seat is a no-brainer for new homeowners.  And, yes, we replaced the toilet flusher as well.  Officially known as the trip lever, this is one of the main functional features in a bathroom.  We felt the shiny brass had to go.  I chose a satin nickel trip lever from the plumbing aisle, and my husband installed it in less than 15 minutes.
Note:  Refer to this video, by Plumbing Supply Group, to learn how you can easily update your trip lever too.
Brass trip lever replaced with satin nickel version
Toilet Paper Holder:  While we were addressing that portion of the powder room, we shopped for a new toilet paper (TP) holder. Man, those things can be costly!  Since one rarely handles the actual holder, we opted to reuse the existing holder and spray it in a nickel finish.  This is a very budget-friendly solution.  We already had the spray paint, so it cost us nothing.
Two coats of metallic finish spray paint updated the TP roll holder.
Door Hardware:  Finally, we inspected the door knobs, stops, and hinges.  These are subtle details in a room that, when updated, make a huge difference.
Door Knobs:  We like levers more than knobs.  So, we replaced the brass knob with a satin nickel door lever.  Whichever style you prefer, make sure it is consistent throughout your house.  To keep the costs in check, we are going rooom-by-room, updating the door hardware each time we update a specific room.
Door Stop:   Door stops are equally significant to the overall look of room.  Baseboard stops, wall stops and hinge-pin stops are all designed to stop a door knob from slamming into the wall.  The hinge-pin door stop was in fine condition, so we just left it as is.
Door Hinges:  Most interior doors are installed with brass or silver-colored door hinges.  By the time a home is 20+ years old, a large number of these door hinges are mismatched and sprinkled with paint stains.  Why?  Because few home owners think to replace hinges when updating door knobs to a different finish, such as nickel or oil-rubbed bronze.  Likewise, few homeowners tape over hinges when prepping trim for paint.
Hinges may seem insignificant, but they really do tell a lot about the house.  We inspected the hinges and found some paint spatters.   I removed these paint spatters with a Q-tip soaked in paint thinner.
Note:  If the hinges were brass, I would have removed them and used spray paint (like the TP holder).  You can also replace them with new hinges in a coordinating finish.
Powder Room door hardware
Phew.  The brass was officially banished:  
Powder room with updated fixtures
Now to address the obvious lack of storage.   This was my first pedestal sink and, while I didn't mind the look, I was not sure how to cost-effectively and attractively store all our stuff.  

Storage:
For the first few months, we used a plastic, three-drawer rolling cart to store necessities.  While this solution was functional, it was absolutely not fashionable.  At all.  I cringed whenever a guest used the powder room.  I was hesitant to purchase a stock vanity and my husband was hesitant to begin a big plumbing project.  So, we made do.  Finally, we found our inspiration at moving sale.  the homeowners were selling a pair of Ikea nightstands.  Hmm...  
Ikea Hemnes nightstand with door
They would certainly hold the items we wanted to store.  And, they seemed narrow enough to fit alongside the pedestal sink.  The color and price was right (we got the pair of nightstands for only twenty dollars), so we brought them home.
Once in place, we realized the doors both swung open from the left.  This was easily remedied by switching the door hinge on one of the cabinets and flipping the door around:
The hinge was originally attached on the left-side...
So we flipped the door and attached it to the right-side.
I placed some bamboo place mats on top, to protect the finish, filled them and went about my business.
Cabinets placed in powder room
After we hung up some art work, and a cabinet behind the toilet, the powder room was officially updated.  We had tons of function in a more updated fashion.  The project, which we completed a few months after moving in, was low-cost and high impact - just how we like it.

We've lived with the powder room storage for a long time, and the storage solution has been wonderful.  Over time, though, the place mats have taken a beating.  Last weekend, I came up with a more durable (yet stylish) solution.  Check back with me and I'll share it with you!


Friday, January 11, 2013

A Little Bit of Both: Cheesecake Stuffed Strawberries and Turtle Brownie Bites


A few weeks ago, I was asked to bring a dessert-type thing to a NYE party, I found it difficult to decide what to bring.  Should I bring a decadent chocolate dessert or a lighter, fruit-based choice?  Should I make something that requires a plate and fork or finger food?  I did not have time to bake the day of the event, so whatever I chose would need to be simple enough to assemble in a couple of hours.

After spending far too long researching what to bring, I thought of the big family dinners we had growing up - these events always included a choice of two or more desserts.  When us kids were asked which selection we preferred, we promptly declared,"A little bit of both."   I had my inspiration:  I would assemble a platter with a little bit of both:  Cheesecake-Filled Strawberries and Mini Turtle Brownie Bites.  

Recipes abound on the Internet and Pinterest for both of these items.  Some recipes call for making your own components, others employ a mixture of those which are store-bought and homemade.  I did not have the time to make my own cheesecake, caramel or ganache - I was going semi-homemade.  While I spent a bit more money in the store, I saved myself the time and hassle of cooking and cleaning all afternoon.  

Keep reading to see how my husband and I assembled a yummy tray of elegant small bites that was a big hit at the cocktail party:

Cheesecake Filled Strawberries

Ingredients:
  • Strawberries, washed well
    Note:  The big, dipping strawberries were not available, so I used the largest I could find the day of the event.
  • Cheesecake
  • Graham Crackers - about 4 squares, crushed

General How-To:
  • I rinsed the strawberries well and patted them dry. 
Rinse the berries really well.
  • Next, I removed any remnant of stem so the berries sat flat on the leaves.  Some recipes advise to remove both the stem and leaves before hulling the berries. My berries were not huge to begin with, so I used the stem as the base of the bite, and removed only the remnants of the stem and left the leaves.   After I sliced the end of each berry (using a paring knife) and removed the cavity, I placed all the cuttings in a bowl for future use. 
Slice the bottom of the berry off...
And remove a cavity from the berry.
  • Once my berries were prepped, I addressed the cheesecake filling.  I originally planned to make my own cake.  But then I took my husband grocery shopping. He suggested that we just buy the cheesecake, rather than spend time making the filling from scratch.  After all,  I really only needed the guts of the cake.  We purchased a small, NYC-style cheesecake (without a crust) in the bakery department.
Store-bought, NYC-style, crust-less cheesecake
  • To prepare the cheesecake filling, I sliced off the hardened top of the cake, placed the rest of the cake in a bowl, and then used a spatula to mix it all together until it had a creamy consistency.
Cheesecake turned into filling
  • I placed a piping tip into the corner of a gallon-sized plastic bag and then filled the bag with my cheesecake mixture.    
Fold sides of the bag down to ease the process, scoop filling and fill your bag.
  • Once all the cheesecake mixture was in the bag, I snipped the corner and squeezed the mixture into the the corner.
Cheesecake filling ready for berries
  • Alas, the tip I chose was a bit small.  When I squeezed the filling, the whole piping tip came out of the hole.  No worries, though - I just piped through the bag, without a tip.  This method worked just as well, and took no time at all.   After I filled all the berries, I used the back of a spoon to smooth the surfaces.
Filling berries took no time at all.
  • Now for the topping.  I crushed up my graham crackers to use as a topping.  I could easily have left the berries unadorned, drizzled them chocolate, topped them with nuts or berry coulis, etc.   
Crushed graham cracker to sprinkle on berries
If you choose graham cracker, as I did, sprinkle the tops of the berries with the graham crackers just before plating so that the topping does not get soft and soggy.
Completed Berries
 My cheesecake stuffed strawberries were a big hit - both taste and presentation were well-received.  My pictures may not be as pretty as the ones on Pinterest (I used my phone's camera), but the taste is just as good or better!  Going semi-homemade was SO the way to go with this dessert, too - everyone seemed to enjoy the combination of cheesecake and strawberries, and no one could tell that the cheesecake was not hand-crafted.


Turtle Brownie Bites:


Now, on to the chocolate portion of the program.  I knew I wanted something rich, dark and chocolaty for my dessert platter.  But what?   My typical cookies were good, but a NYE party dictated something a bit more dressed up.  While scouring Pinterest for ideas, I happened across several repins for turtle brownie bites.  Hmm.  Chocolate, caramel, pecan and brownie?  All in two bites?  Yum!

Just like the strawberries, many recipes exist, with varying degrees of complexity.  My husband offered to assist me with the preparation, and loved the idea of semi-homemade as well.  So, rather than making brownies from scratch, homemade ganache or salted caramel sauce, we bought ready-made ingredients, and assembled them into our version of the mini turtle brownie bite!

Ingredients:
  • Brownie Bites
  • Caramel Topping
  • Fudge Topping
  • Pecan Halves
Mini Turtle Brownie Bites:  Four Ingredients are all it takes!
General How To:
I lined a cookie sheet with wax paper and a baking/cooling rack.  The wax paper is to catch the drips from the toppings.  Next we placed the brownie bites on the rack.    After my husband microwaved the fudge topping (so that it would drizzle properly), he simply used a spoon to drizzle the toppings on each brownie.  Then, he placed a pecan half on top.  That's it.  Super simple and done in 5-10 minutes.

Wax paper catches caramel and fudge topping drips.
  • He placed the sheets of brownie bites in the refrigerator to set up.  The bites were good to go after about an hour.  
Let bites set up in refrigerator for about 1 hour
After removing them from the refrigerator, we placed each bite in a mini cupcake liner.  This made it easier for guests to handle - no one likes sticky hands!
And, to transport the brownies, we plated them with an overturned funnel to keep the plastic wrap from messing up the tops.
Turtle Brownie Bites ready for transport.
These were a hit with guests as well.  The chocoholics in the crowd especially loved them.
A little Bit of Both:  Plated and ready to Enjoy!
Both of these small bites are in my rotation for quick, easy, and party-worthy dessert items.  I was able to assemble them in less than an hour, and did not spend a ton of time cleaning up pots, pans, etc.

By being O.K. with going semi-homemade, I was also able to share a little bit of both with my friends.  What's better than that?

Have you made these items?  Share with me what tips and hints you have.