Tuesday, December 18, 2012

Make a Palm Frond Reindeer

Palm Fond Reindeer
Palm frond reindeer, especially red-nosed Rudolph, are found all over the coastal regions in the winter.  Having grown up in the north, I never heard of them.  Then I moved south and a neighbor of mine, who happened to hail from Tampa, FL, gave me one.  I've been a fan ever since.

Making your own palm frond reindeer is a snap, and can be a great kid's craft activity - I've made them with my own kids as playdate and pre-school activities.  They make great decorations inside and outside of the house and are always an appreciated gift.  Want to make one yourself?  Keep reading to see how you can.

Where to Find Fronds
Since not everyone has palm trees in their yard, even along the coast, keep an eye out for palm fronds in the following places:
  • Felled Fronds:  When we lived in Savannah, our yard was home to several palm trees, including cabbage palm trees.  These are the ideal trees for this simple craft.
Cabbage Palm trunk with fronds
Palm fronds fell from the trees often enough that we could keep an eye out for craft-worthy fronds around the base of trees.
Backyard palm trees drop fronds throughout the year.
We even find palm fronds at base of palm tree in shopping center parking lots.
  • Nature Walks:  Walking and biking paths are great places to find fronds along the southern coast.  Fronds are always around the base of the palm trees.   And, the next time you are at a GA, SC, or FL beach, keep an eye out for palm fronds that wash in with the tide.  These feature a nice, weathered look
Walking path in Savannah, GA
A palm frond washed in by tide and found along the rack line in Hilton Head, Island, SC. 
  • Vacation Properties:  Next time you go on a beach vacation, take a look at the palm trees on the hotel property. Even the best maintained trees drop fronds. 
Palm about to drop its frond along hotel property walkway
I 'may' have helped it fall off.
  • Phone a Friend:  Someone always knows someone, right?  If you don't live near palm trees, and aren't planning to vacation anywhere near palm trees soon, but still want to make your own palm frond reindeer, you can always call a relative or friend.  Ask someone to send you a frond, send you a completed craft, etc.  And, thanks to lots of great resources online, you can always order a completed palm frond reindeer from Etsy or eBay, etc.
Preparing a Palm Frond:
Once you have gathered a palm frond or two, prepare it for your reindeer:
  • De-bugging:  Many tiny little bugs call palm trees home, and you definitely don't want these in your house.  The easiest way to de-bug a palm frond is to simply place it in an air-tight bag for a few days.  If you want to also spray some bug spray in there, feel free to do so.  
  • Trimming:  Use a rasp, saw, etc. to trim the frond as desired.    
Making the Reindeer:
  • All you need for the basic palm frond reindeer are googly eyes, mini pom-poms and a hook for the back.
Basic Supplies Needed for Palm Frond Reindeer
  • Get creative.  More artistic folks paint beautiful faces.  Others enjoy adding jingle bells, ribbons, etc. to personalize the reindeer even more.  
Hot Glue Eyes and a nose.
  • Add a hook by adhering a floral wire hoop by applying a generous amount of glue - I find hot glue holds the best.
Hot glue holds floral wire to the back.
That's all it takes. The reindeer is complete.  Hang him on display and enjoy!
Reindeer hung by screened porch door
Reindeer hanging on interior wall.
Reindeer hanging in the plants.
Next time you are in a coastal setting, take a look and see if there are any palm fronds waiting to become a reindeer!

Sunday, December 16, 2012

Origami Christmas Cards


As happens every year, the whole idea of holiday cards and the obligatory holiday photo of the kids provided me with an ample dose of agita.   Last week, I finally sat down to choose a photo of the kids, upload said photo, create the card online and order cards.  The photo card software did not like the format of the picture I chose.  Or the next three.  Argh.  After a few more tries and a few more sites, I decided to simply order reprints and mail regular cards.
I started looking online at greeting cards, didn't really like any I saw, and considered just making my own cards.  Did I have time for making holiday cards?  With 12 days left before the holiday?  And shopping, school projects, and baking to do?  How did I get myself in this predicament again?
Then I stumbled upon an origami site that had tutorials for several holiday-themed models.  They were so cute.  I decided that, maybe, I did have time to make Origami Holiday Cards.  I scratched holiday baking off the to-do list and, instead, spent an afternoon folding paper.  Crazy talk, I know.  However, the process turned out to be relaxing and fun.    The decision was kinder to my waistline, gave me a new skill, and resulted in some really cute cards.  Bye-bye agita.

Materials I used:
  • Greeting Cards and Envelopes - I purchased a pack that included red/green cards and white envelopes.
  • Origami Paper - I purchased 7" x 7" Origami paper in multiple colors. 
  • Paper Punches - snowflake and star
  • Bone Folder
  • Adhesive 
  • Online Origami Patterns
Materials needed for Origami Holiday Cards
Origami Paper:
When I hunted around for some spare paper with which to create the origami, I realized that my scrapbooking paper was a bit heavy, and colored on both sides.  I headed out to the craft store and bought a package of papers (with assorted solid colors).  Origami paper is relatively thin, holds a crease very well, and is typically white on one side.  It's sold in several standard sizes.  

Origami Folds:
Most origami is created using a combination of standard folds.  Take a look at this website for descriptions and demonstrations of each fold.  For some folds, I used a bone folder, a common card making and book binding tool, to keep the creases smooth.

Making My Origami Models:
I found a tutorial for folding tree models and got to work.  It's pretty basic (requires seven simple folds), but was so striking when completed.  I added the yellow star on top using a mini craft punch.
Origami Trees
When I ran out of green papers, I attempted the Santa origami model.  It took a few tries to get the folds exactly the right way.  I had only 10 sheets of the red, so I made 10 Santa models.  Each one is a bit different, but still recognizable. The white snowflake is his finishing touch.
Origami Santa
When the red and green papers were all gone, I searched the website for another origami design.  The bell model was pretty, and used yellow paper - perfect.  The folds on bell were a bit confusing towards the end.  Luckily, there is a great video associated with each model on the website.  I watched the video and was able to complete a couple of good bells before I moved on.
Origami Bell
Wanting a more straightforward design, I finished up with wrapped package models.  They turned out really cute with snowflakes as bows.  I used a variety of colors, which was good because I had several non-holiday-ish colors left.
Wrapped Packages
Finishing Cards:
After all the origami was completed, I began assembling the cards.  I adhered the models to the card fronts,  glued the photo to the inside and signed the card.  The back of each card is punched with a snowflake and  initialed.  The snowflake appears white because the back of the photo (inside the card) is white.
Back of card
I was able to make fifty cards in an afternoon for less than fifty cents a piece.  I picked up a new skill, created something handcrafted, and reduced some of that pesky holiday stress.  Hooray!

Tuesday, December 11, 2012

Our Star Wars Party


My son celebrated his tenth birthday this past week.  To mark the occasion, he invited some friends to hang-out and sleep over.  At ten, he says he's too old for some of the cool DIY Star Wars-themed party decor, food, and favors I see online - he reminds me constantly that he is now a preteen, after all.  We kept things simple and managed to still create a fun time for he and his friends.  He enjoyed helping out with the planning and preparation, which made the process even more fun.

Having a Star Wars themed party yourself?  You can find themed items in most every retail space - both online and brick/mortar.  Keep reading to see what we came up with - maybe it will spark an idea or two for you.

Invitations:
Invitation for the party
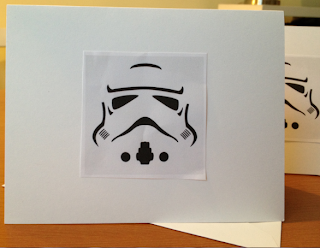
I used blank greeting cards for the invitation.  A Stormtrooper image, downloaded from the Internet, was pasted on the cover, and party details filled the inside.

If you create printed materials yourself, the biggest must-have is the Star Wars font, available for free online at FontSpace.  I used the Star Jedi font for most of my printed materials (invites, name tags, magnets, etc).  The kids loved seeing their names in that telltale font.
Free Star Wars Fonts are great for party paper projects
Giveaway Bags:
Giveaway Bags
For the giveaway bag, I purchased white bags at the craft store and adhered the same Stormtrooper graphic to the front.  The bags were filled with themed goodies I thought the kids (er, preteens) would appreciate.  I bought Star Wars tatoos, notepads, light-up lightsaber candies,  PEZ dispensors, and Angry Birds Star Wars Mystery bags.  Star Wars themed items are available everywhere.   I  could have gone crazy...
I also made magnets for each boy using a Stormtrooper graphic (found on Google Images) and the free Star Wars font.

Decorations:
Decor for the party
  • LEGO Sets:  We have plenty of these - they were displayed on flat surfaces. 
  • Star Wars Toys:  We also set out my son's large Millenium Falcon, lightsabers, and other action models for display.  I had to smile when the minifigures came out for some spontaneous role playing throughout the night - it reminded that they are still pre-teens and not full-fledged teens yet.
  • Printables:  I found really great Star Wars printables online to use as wall decor and fun masks:
    I printed all the .pdf files using my color printer and laminated the faces that my son liked the most.  Then we  trimmed around the graphics using scissors.  Some of the printables are intended to become masks.  I used an X-acto knife to cut out the eye holes on these.  My son helped out by attaching a chopctick to the back side using tape.
Taking a moment out to pose for a picture. 
Party Food:
We made recipes from my son's favorite cookbooks
What's a party without food, right?  My son had a great time planning the menu using his Star Wars Cookbooks, Wookie Cookies: A Star Wars Cookbook and The Star Wars Cookbook II - Darth Malt and More Galactic Recipes.  We did not use all the recipes he selected, though the ones we did serve were a huge hit.

Sweets:  
Wookie Cookies and mini Tie Fighters 
Wookie Cookies:  
My daughter baked the Wookie Cookies for the party using the cookbook's recipe.  You don't need to run out and buy the cookbooks if you don't already own one.  Lots of bloggers have provided the recipes online.  Click here to go to a site featuring the Wookie Cookie recipe.  It's basically a chocolate-chip cookie with some cinnamon added in.  A definite fan favorite with the pre-teen set.

Mini Tie-Fighters:  
A fleet of Tie Fighters ready for battle.
I found photos of the cute mini tie fighters online.  Because my son loves Oreo thin Crisps, I knew I had to make these for the party.  Assembling these cute treats was SO easy.  Here's how I did it:

I gathered up the ingredients:
  • Oreo Thin Crisps
  • Note:  Boxes are sold with six packets.  Each individual packet contains about 22 crisps - enough for 11 tie fighters.
  • Mini marshmallows
  • Cookie Icing
    Note:  Frosting, icing, or melted chocolate will work as the glue.  I happened to have cookie icing on hand from a school activity, so that is what I used.
Ingredients for Mini Tie Fighters
I removed Oreo Thin Crisps from packaging and remove any broken pieces.  Next, I arranged one crisp with non-sugared side facing up.  Place a small dot of icing in the middle of the crisp:
A very small amount of icing does the trick!
Then, I centered the mini marshmallow on the icing:
Be sure to place marahmallow flat-side down.
I placed another dot of icing on the second crisp and place it atop the marshmallow.
Note:  Gently press down to adhere the icing and allow the tie fighter to set up - about 30 minutes should be enough time.
Side view of assembled Tie fighter.
We set up an assembly line to speed things up:
Tie Fighter assembly line
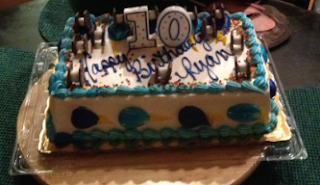
Once completed, some tie fighters were served as is, while others were used to embellish the (store-bought) cake:
Some for immediate consumption...
And some to adorn the birthday cake.
Savory Snacks:
The savory side of things included pizza (of course), some basic snack food and Tie fighter Ties, another recipe from the Wookie Cookie cookbook.

Tie Fighter Ties:
This recipe is from the Wookie Cookies: A Star Wars Cookbook as well.   Click on this link for an online version of the recipe.
Tie Fighter Ties
Basically they are pigs in a blanket, made using refrigerated bread stick dough, rather than crescent roll dough.  I used full-sized hot dogs cut into thirds.  They did not turn out exactly like the book; however, I got rave reviews from the guests who gobbled them up pretty quickly.  That's good enough for me!

Activites:
The bulk of the party was just boys hanging out and being boys.  They did take breaks to play the Angry Birds Star Wars Game and trade their collectible figures (from the giveaway bags).  They also played Star Wars video games, assembled the LEGO sets he received as gifts, engaged in lightsaber battles, peeked in on the Star Wars movies (streaming on the TV), etc.  Allegedly, they stayed up until almost 3:00 a.m.

All in all, it was a great, way to celebrate the milestone that is his tenth birthday!  Everyone had a great time and I was able to create a fun atmosphere without spending a fortune in the process.  That is a win-win!

Monday, December 3, 2012

Updating Frames with Paint

A few months ago, I updated some of my framed art by removing the print and replacing it with fabric.  This past weekend, I updated more framed art in my house.  However, this time, I kept the existing prints intact, and used spray paint for a whole new look.
The prints in need of an update were were mementos from a trip to Dunns River Falls, originally purchased on a Jamaican vacation several years ago.  When we decorated our first house, I framed the two prints, to match the family room decor:
Prints framed in white-washed frames and green photo mats.
In our current house, we hung the prints in the basement for a time, though the framing has not stood the test of time.  We've intended to address the artwork when we eventually repaint the room.  Over the months, the artwork bothered me every time I looked at it - the frames are too small in proportion to the wall and the white-wash finish/hunter green mats no longer appeals to me.
Outdated framing not really the right look in current house.
A few weeks ago, after we updated the basement lighting and added fabric wall hangings, I removed the prints and placed them in storage.  I needed to see the wall empty before I hung anything else there.  I did not know how long the wall would be empty, but I knew I'd feel inspired eventually, and did not want to rush it.  These days, when it comes to decor, if I don't really LOVE it, I am not spending a dime on it.

This past Saturday, we bought a custom-framed panoramic photo of Atlanta at a moving sale (for a fabulous price).  The frame was royal blue, which I knew would not work anywhere in our home.  However, I felt the photo would perfectly fill the space above the massive, widescreen television in the basement.  To remedy the unfortunate frame color, I decided to spray paint the frame black.

Paint is the cheapest way to make the biggest impact - and not just on walls.  Frames are perfect candidates to be up-cycled or recycled using paint.  An hour or two and a few bucks are all it takes.  Keep this in mind before you toss or donate old artwork.  And, keep it in mind when you are shopping at sales, thrift stores, or flea markets.

While we were purchasing black spray paint in the home improvement store, I thought of the Jamaica prints.  What if I also use spray paint to update their look?  It would save me money on artwork and re-purpose items we already love.  We stopped in the craft store to buy new photo mats and headed home to update the art.

Prepare the Frame:  The first thing I did, after pulling the prints out of storage, was to remove the artwork and glass from the frames:
Print, mat and glass from frame.
Frames ready for paint.
The newly acquired print been custom-framed.  Because we did not want to mess with the backside, we used paper and tape to cover the glass front and protect it from paint over spray:
Paper and tape protect the glass while spraying.
Paint:  We used two coats of black, universal gloss spray paint.  The paint works well on wood, plastic, metal etc.  So, we knew we could use it on both types of frame with no issues.  My husband applied the spray paint outside - in a well-ventilated area.

Insert Artwork:  After the frames were dry, I inserted the new photo mats and original artwork, making sure to center the print.
Painted frames ready for artwork.
 And the artwork was ready to hang.
Artwork with new mats and newly painted frames!
Frame update complete!
Rehang Artwork:  Up went the new Atlanta print.  Up went the new artwork.  We added shelves and relocated the pool cues while we were at it.
Updated artwork rehung on walls.
I am so glad I did not wait until we painted the entire room to make this change.  For just under twenty dollars (for the paint and new mats), we were able to breathe new life into our beloved prints.  What a difference this interim update makes.

While the spray paint was out, I decided to update and up-cycle even more artwork: with spray paint:

I sprayed an old frame with white spray paint and replaced the poster with a quilt remnant.
I refreshed an estate sale find with black paint.