Showing posts with label how-to. Show all posts

Tuesday, September 24, 2013

Sew a Recycled Denim Bottle Bag


 My son likes to say, "I grow a little bit each day."  Indeed.  So, this past month, rather than donate five pair of his now too-short jeans to charity (as I usually do), I decided to upcycle them into various projects.

The first project on my list:  Denim Bottle Bags.  These denim bags are easily found on Etsy and Pinterest - and I always admire them.  Because I've sewn bags before, I figured making some bottle bags could not be that difficult.  With the kids back in school, and a basket full of the too-short boys' jeans, I decided the time had come to attempt making some of my own denim bottle bags.

Prepping Material:
  • Denim:  After measuring a wine bottle, I learned that a finished bag should be about 13-inches long and about 7-inches wide.  To account for the seams, I needed to prepare a piece of denim approximately 14.5" x 15".  One jean leg per bag was perfect.   This is a recycle / upcycle project, so of course some jeans had holes in the knees, and others had stains that just refused to come out in the wash (love that Georgia clay!).  I went ahead and used the legs, imperfections and all.  Remember, any denim works - no matter where it comes from. 
  • Liner Fabric:  I wanted a bag with a fold over reveal.  So, the liner fabric needed to be a few inches longer than the outer fabric to account for the reveal.  I cut fabric pieces at about 2 inches longer (14.5" x 17") than the denim.  Most of the bag liners are remnants that I had in my fabric stash.  Fully embracing the recycle portion of the project, I even cut a liner from an old pair of too-short girl's pajama pants - the dachshund pattern was so cute.  
  • Handle Fabric:  Fabric for handles was a bit trickier.  I wanted the handles to match the liners.  Because I was using remnants, I had a bit of trouble getting enough fabric in the right dimensions.  I experimented with various lengths, and finally decided the best measurement was a strip of fabric about 3" x 18".   You can avoid the issues I had by using fresh fabric or using other materials all together, such as rope, twine, etc.        
One afternoon later, I have a nice collection of bottle bags suitable for various types and sizes of bottles and gifts.  Th are perfect for wine bottles, shorter bottles, coffee cups, water bottles.  And, of course, other non-bottle-type contents.
Various sizes suitable for various items.
 If I may say so, they turned out super cute.  Keep reading to see how I made them:

Denim Bottle Bags:
Materials:
  • Old denim jeans
  • Fabric for the liner and strap.
  • Tape measure and quilting ruler, pencil or pen
  • Scissors and/or rotary cutter
  • Ironing board and iron
  • Sewing machine, thread, pins
General How-To:

Step 1:  Prep the Denim for outside of bag:
Cut  off the leg at desired length.
Turn leg inside out and compare the seams.
Remove the inside seam.
Remove bottom hem.
Note:  Jeans may vary in dimensions.  Trim the denim to your specific desired width.  Make sure the denim's outside hem is slightly off-centered - it is a great detail on the front of the finished bag.

Step 2:  Prep the liner fabric:
Remove the selvage and trim fabric to desired size.
Note:  Pay attention to the fabric's pattern orientation when you measure and cut.  The fabric I used in this example has a leaf pattern with a distinct top and bottom.  I cut the fabric so that, when the folded edge shows on the outside of the bag, the stems face up.
Iron out the wrinkles.
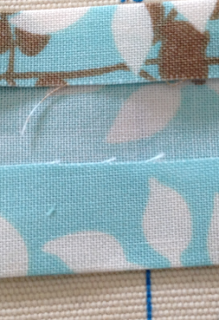
Fold top edge of fabric over 1/4" and iron.
Fold edge over again - 1 1/2" or so and iron.
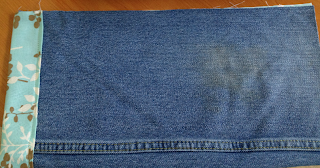
Place denim on top of the liner fabric and line edge up with the bottom crease.
If needed, flip the whole thing over and trim ends so they line up.

Step 3:  Prep the Handle fabric:
Cut a piece of fabric approximately 3" x 18".
Fold one side over 1/4" and iron.
Fold other side over about 3/4" and iron.
Fold each end in about 1/4" and iron.
Fold the whole thing in half and iron down.
All prepped and ready to sew.
Step 4:  Sew it all together:
Sew the handle together.
Sew the liner to denim along the bottom of the reveal.
Fold the bag in half (wrong-side together) and sew a 3/8 " seam along the bottom and side.
Trim away excess fabric to remove bulk.
Turn the bag inside-out.
 Sew 1/4" seam along the bottom and side.
Note:  This seam will enclose the unfinished edge so that it is not visible inside the bag.

Sew the handle to the bag.
All done!
Fill with a bottle and gift-away!

Tuesday, December 18, 2012

Make a Palm Frond Reindeer

Palm Fond Reindeer
Palm frond reindeer, especially red-nosed Rudolph, are found all over the coastal regions in the winter.  Having grown up in the north, I never heard of them.  Then I moved south and a neighbor of mine, who happened to hail from Tampa, FL, gave me one.  I've been a fan ever since.

Making your own palm frond reindeer is a snap, and can be a great kid's craft activity - I've made them with my own kids as playdate and pre-school activities.  They make great decorations inside and outside of the house and are always an appreciated gift.  Want to make one yourself?  Keep reading to see how you can.

Where to Find Fronds
Since not everyone has palm trees in their yard, even along the coast, keep an eye out for palm fronds in the following places:
  • Felled Fronds:  When we lived in Savannah, our yard was home to several palm trees, including cabbage palm trees.  These are the ideal trees for this simple craft.
Cabbage Palm trunk with fronds
Palm fronds fell from the trees often enough that we could keep an eye out for craft-worthy fronds around the base of trees.
Backyard palm trees drop fronds throughout the year.
We even find palm fronds at base of palm tree in shopping center parking lots.
  • Nature Walks:  Walking and biking paths are great places to find fronds along the southern coast.  Fronds are always around the base of the palm trees.   And, the next time you are at a GA, SC, or FL beach, keep an eye out for palm fronds that wash in with the tide.  These feature a nice, weathered look
Walking path in Savannah, GA
A palm frond washed in by tide and found along the rack line in Hilton Head, Island, SC. 
  • Vacation Properties:  Next time you go on a beach vacation, take a look at the palm trees on the hotel property. Even the best maintained trees drop fronds. 
Palm about to drop its frond along hotel property walkway
I 'may' have helped it fall off.
  • Phone a Friend:  Someone always knows someone, right?  If you don't live near palm trees, and aren't planning to vacation anywhere near palm trees soon, but still want to make your own palm frond reindeer, you can always call a relative or friend.  Ask someone to send you a frond, send you a completed craft, etc.  And, thanks to lots of great resources online, you can always order a completed palm frond reindeer from Etsy or eBay, etc.
Preparing a Palm Frond:
Once you have gathered a palm frond or two, prepare it for your reindeer:
  • De-bugging:  Many tiny little bugs call palm trees home, and you definitely don't want these in your house.  The easiest way to de-bug a palm frond is to simply place it in an air-tight bag for a few days.  If you want to also spray some bug spray in there, feel free to do so.  
  • Trimming:  Use a rasp, saw, etc. to trim the frond as desired.    
Making the Reindeer:
  • All you need for the basic palm frond reindeer are googly eyes, mini pom-poms and a hook for the back.
Basic Supplies Needed for Palm Frond Reindeer
  • Get creative.  More artistic folks paint beautiful faces.  Others enjoy adding jingle bells, ribbons, etc. to personalize the reindeer even more.  
Hot Glue Eyes and a nose.
  • Add a hook by adhering a floral wire hoop by applying a generous amount of glue - I find hot glue holds the best.
Hot glue holds floral wire to the back.
That's all it takes. The reindeer is complete.  Hang him on display and enjoy!
Reindeer hung by screened porch door
Reindeer hanging on interior wall.
Reindeer hanging in the plants.
Next time you are in a coastal setting, take a look and see if there are any palm fronds waiting to become a reindeer!

Monday, December 3, 2012

Updating Frames with Paint

A few months ago, I updated some of my framed art by removing the print and replacing it with fabric.  This past weekend, I updated more framed art in my house.  However, this time, I kept the existing prints intact, and used spray paint for a whole new look.
The prints in need of an update were were mementos from a trip to Dunns River Falls, originally purchased on a Jamaican vacation several years ago.  When we decorated our first house, I framed the two prints, to match the family room decor:
Prints framed in white-washed frames and green photo mats.
In our current house, we hung the prints in the basement for a time, though the framing has not stood the test of time.  We've intended to address the artwork when we eventually repaint the room.  Over the months, the artwork bothered me every time I looked at it - the frames are too small in proportion to the wall and the white-wash finish/hunter green mats no longer appeals to me.
Outdated framing not really the right look in current house.
A few weeks ago, after we updated the basement lighting and added fabric wall hangings, I removed the prints and placed them in storage.  I needed to see the wall empty before I hung anything else there.  I did not know how long the wall would be empty, but I knew I'd feel inspired eventually, and did not want to rush it.  These days, when it comes to decor, if I don't really LOVE it, I am not spending a dime on it.

This past Saturday, we bought a custom-framed panoramic photo of Atlanta at a moving sale (for a fabulous price).  The frame was royal blue, which I knew would not work anywhere in our home.  However, I felt the photo would perfectly fill the space above the massive, widescreen television in the basement.  To remedy the unfortunate frame color, I decided to spray paint the frame black.

Paint is the cheapest way to make the biggest impact - and not just on walls.  Frames are perfect candidates to be up-cycled or recycled using paint.  An hour or two and a few bucks are all it takes.  Keep this in mind before you toss or donate old artwork.  And, keep it in mind when you are shopping at sales, thrift stores, or flea markets.

While we were purchasing black spray paint in the home improvement store, I thought of the Jamaica prints.  What if I also use spray paint to update their look?  It would save me money on artwork and re-purpose items we already love.  We stopped in the craft store to buy new photo mats and headed home to update the art.

Prepare the Frame:  The first thing I did, after pulling the prints out of storage, was to remove the artwork and glass from the frames:
Print, mat and glass from frame.
Frames ready for paint.
The newly acquired print been custom-framed.  Because we did not want to mess with the backside, we used paper and tape to cover the glass front and protect it from paint over spray:
Paper and tape protect the glass while spraying.
Paint:  We used two coats of black, universal gloss spray paint.  The paint works well on wood, plastic, metal etc.  So, we knew we could use it on both types of frame with no issues.  My husband applied the spray paint outside - in a well-ventilated area.

Insert Artwork:  After the frames were dry, I inserted the new photo mats and original artwork, making sure to center the print.
Painted frames ready for artwork.
 And the artwork was ready to hang.
Artwork with new mats and newly painted frames!
Frame update complete!
Rehang Artwork:  Up went the new Atlanta print.  Up went the new artwork.  We added shelves and relocated the pool cues while we were at it.
Updated artwork rehung on walls.
I am so glad I did not wait until we painted the entire room to make this change.  For just under twenty dollars (for the paint and new mats), we were able to breathe new life into our beloved prints.  What a difference this interim update makes.

While the spray paint was out, I decided to update and up-cycle even more artwork: with spray paint:

I sprayed an old frame with white spray paint and replaced the poster with a quilt remnant.
I refreshed an estate sale find with black paint.