Showing posts with label basement. Show all posts

Monday, August 20, 2012

Bathroom Refresh

Basement bathroom before and after a much-needed refresh
We love the full bathroom (four-piece washroom) in our basement.  The room has great bones:  tile flooring, a vanity with lots of storage, and plumbing that works.   A few decorating updates after moving in were all we felt the room needed.  Or, rather, they were all we felt like completing - jazzing up the basement bathroom was not high on the priority list, after all.

Immediately after we moved in, we updated the following items in the bathroom:
  • Bathroom Fan Duct:  We ran duct work from the bathroom (interior room) through the ceiling to an exterior wall vent, as recommended in our home inspection report.
  • Light Switch:  We changed it from toggle-style switch to a rocker-style switch.
  • Toilet seat:  A no-brainer for any new homeowner.  
  • Shower curtain rod:  We updated existing chrome shower rod with a curved, brushed nickel version. 
  • Towel Bar/toilet paper holder/robe hook:  We updated from chrome to brushed nickel.  
  • Art work:  We re-purposed artwork from the old house.
First round of updates completed when we moved in.
These were all simple and inexpensive updates.  But, over the next several months, a few things began to bug us.  Like the door knob that trapped guests in the room because it did not turn easily.  And the fluorescent light fixture that did not always turn on.  And the very small, shallow sink basin/faucet combination.  And the too light, pinkish-hued paint color.  I could go on and on.  It was time for a bathroom refresh.
This past weekend, we got to work.  We put our design stamp on the room and checked off one more item on our 'to-do' list.  We love the results.  Keep reading to see what we did and pick-up a few tips and hints if you decide to refresh your bathroom as well.
Here are the items we updated to refresh the tired bathroom:
  • Door Hardware 
  • Paint
  • Vanity
  • Backsplash
  • Lighting
  • Mirror
Refresh One:  Door Hardware
The bathroom door knob was always a bit temperamental.  We assume moisture from the improperly vented bathroom fan is to blame.  Although we've figured out how to deal with the knob, others have not.  So when a friend was recently trapped in the bathroom because the knob would not turn, we knew it was time to address the issue.
Refresh One:  Door Hardware

Door Levers:  I happen to prefer the lever style over knob style.  Whichever style you prefer, make sure it is consistent throughout the house.  It's a subtle detail that, when updated, makes a huge difference - especially when you want/need to sell and have to compete with 'new construction.'  Take a look at your door hardware.  If your door knobs are scratched or paint-stained, consider refreshing them.
Satin Nickel lever replaces brass knob
We chose a lever-style in satin nickel finish.  We plan to update all our doors over time, tackling each door as we address the corresponding room.  We used the stop watch (for fun) to time how long this update took.  We spent just over five minutes (five minutes and 8 seconds to be exact) to change the knob
Note:  A less expensive fix is to clean and spray-paint the knobs in a metallic finish.
Door Hinges:  Most interior doors are installed with brass or silver-colored door hinges.  By the time a home is 20+ years old, a large number of these door hinges are mismatched and sprinkled with paint stains.  Why?  Because few home owners think to replace hinges when updating door knobs to a different finish, such as nickel or oil-rubbed bronze.  Likewise, few homeowners tape over hinges when prepping trim for paint.
Paint-sprinkled hinges
Hinges may seem insignificant, but they really do tell a lot about the house.  We inspected the hinges before we headed to the store.  They were a silver metal finish and were clean, so we left them as-is.
Note:  Remove small paint spatters with a Q-tip soaked in paint thinner.  To change the paint finish, remove the hinges and spray paint them.  You can also replace them with new hinges in a coordinating finish.
Door Stops:  Another small detail, door stops, are equally significant to the overall look of room.  Baseboard stops, wall stops and hinge-pin stops are all designed to stop a door knob from slamming into the wall.
No matter the style you choose, match the finish to either the door hardware or trim paint color We paid $1.25 for the baseboard stop in this room to update it from a broken door stop to a rigid baseboard stop in satin nickel finish.

Refresh Two:  Paint
I love what a simple, inexpensive can of paint can do to a room.  The bathroom's existing paint color matched what was used throughout the basement - we assume the previous owners chose it when building out the basement.  While it is a neutral color, we do not really care for the pink undertone.   So, we chose a more saturated color (Pebble Path by Behr) and painted two coats on the walls.
Refresh Two:  Paint
Prepping the room (removing fixtures and taping) took about thirty minutes.  The actual task of painting took less than two hours.  Once the paint was dry, we rehung the shower curtain rod and towel rack, switched out towels, and replaced artwork.  Then, we moved on to the next refresh.

Refresh Three: Vanity
We intended to replace the entire vanity in this bathroom.  In fact, we purchased a replacement vanity last summer.  Once we got the vanity home, however, we realized that the existing vanity had been installed before floor tile was laid.  Grout lines around the base of the cabinet revealed this fact.  We found no extra flooring tiles anywhere in the house.  This meant that a replacement vanity needed to match the exact measurements of the existing vanity - a larger or smaller size meant messing with the floor.
Refresh Three:  Vanity
We confirmed that the existing vanity was originally a white cabinet when we removed the existing cabinet pulls and saw stark white circles on the doors.
Note:  I will never understand why people do not remove fixtures/pulls/hinges/etc. before painting.  That is a major pet peeve of mine.
Cabinet pulls were not removed prior to painting.  Argh. 
The bottom of the cabinet was left white to blend with the base trim molding in the room.
Cabinet was installed before flooring .
Rather than replace the vanity, we decided to refresh it by completing the following updates:
  • Replace the countertop and sink with granite vanity top combo
  • Replace the faucet
  • Repaint the cabinet doors (to fix the imperfections)
  • Add tip-out trays to create more storage
  • Replace the cabinet pulls
Vanity Top Combo:
Because the vanity was staying, we shopped for a pre-assembled vanity top that matched the vanity's dimensions.  We found two options we loved:  a stone-like material  and granite.   Ultimately, we chose the granite vanity combo because it was slightly cheaper.  Also, because it was granite!
Note:  The stone-like material combo includes only one side splash.  The granite combo included two side splashes.
The vanity top combo was the perfect fit!
We've replaced vanities before, so we already knew what steps to take.  If you have never attempted this yourself, check out this great tutorial from DIY Network.    

Faucet:
The original faucet was an inexpensive center mount faucet.  The vanity counter top came with an under mount sink and was pre-drilled for an 8-inch widespread faucet, so we knew we were going to replace it.    Before heading out to the store, I snapped a picture of the vanity specifications.  I referred to it a few times as I perused the huge wall-o-faucets at the home improvement store. Knowing I wanted satin nickel and 8-inch widespread made my selection process much easier.    
Note:  Read more about faucet sizes on Dimensions Info's web site.
To save time (and backache), my husband installed the faucet parts to the vanity top before actually attaching  it to the cabinet base.  The water pipes and drain all fit perfectly on the first try.  He simply tightened the pipe connections and turned the water back on to test.  No leaks.
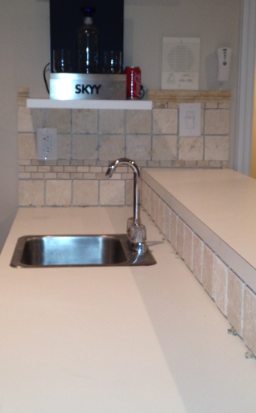
Faucet upgrade - love the pop up drain!
Tip Out Tray:
I love to optimize storage whenever possible - adding additional, hidden storage with a tip out tray is a great example.  It attaches to the inside of the base cabinet's front panel and provides additional storage for small items.  My husband uses the basement bathroom as his executive washroom (he works from home), so I appreciate having his toiletries hidden.  He appreciates still keeping them handy and within reach.

Tip-out tray adds storage and keeps counter top clear!
Tip out trays are readily available in home improvement stores and take little time to install.  To install, my husband removed the front panel of the vanity, installed the hinges and trays and was done.  Such a great, quick upgrade - it takes just about ten minutes to install the tip out trays.
Note:  Check out this Merillat file to see how easy it can be to add tip out trays

Cabinet Doors and Pulls:
I knew I wanted to use bar pulls in a satin nickel finish.  Because we added the tip-out tray, we bought three pulls - two mounted verically and one mounted horizontally.  Before I could install them, however, I needed to correct the original paint job.  We found a quart of the mocha-colored paint (Coffee Bean by Valspar), used to paint the original vanity, left behind by the previous owners.   Phew.
Note:  If we had not found the paint, we would have brought a door to the home improvement store and asked them to color match.  Most stores can easily and quickly do this for you.
Cabinet door after first sanding and paint touch up.
We removed the cabinet doors, sanded and applied paint.  Twice.  Once dry, we measured and drilled a second hole on each door and attached the bar pulls.
Note:  We bought a drill template at Ikea years ago - it makes the job of marking and drilling consistent handle holes a breeze.
New pulls installed.
Once we attached the bar pulls, we were done with the vanity.  It did require a few extra steps (darn cabinet doors), but we ended up with a lovely finished product.  Well worth the effort.

Refresh Four:  Backsplash
While in the tile outlet store shopping for the vanity top, I spied a beautiful mosaic tile that coordinated wonderfully with our scheme.  We decided to install it as a backsplash.  The vanity top already came with side splashes, one of which meets up (tightly) to the plate glass mirror we had to work around.  So this mosaic tile is more of a decorative feature.
Refresh Four:  Tile Backsplash
We bought two sheets of the mosaic (Loreto Mosaic Marble Tile), two pieces of pencil trim tile, and some unsanded grout:
Tile mosaic we chose for the backsplash
We ended up only using one sheet of the mosaic to complete the project.  In my post from a couple weeks ago, I explain how to add a tile backsplash using travertine tile.  We followed the same basic method, making the following two changes to accommodate the various stones comprising the mosaic:
  • We trimmed the tile using a wet saw.
  • We grouted using an unsanded grout to protect the polished finish of the tile.  
Tile complete.
Another quick update.  We spent a total of about one hour, split over two evenings, to complete this backsplash.  I think tiling may be my new favorite project.

Refresh Five:  Lighting
The existing fluorescent light fixture was suspended in the drop ceiling - it was utilitarian, and not at all decorative.  It often require two or more flips of the switch to activate.  Similar to the sticking door knob, we assume moisture from the improperly vented bathroom fan is to blame for the light's issues.  We opted to replace it with a wall-mounted light fixture instead.
Refresh Five:  Lighting
I chose a fixture that uses four globes, to optimize light - it's an interior room with no windows.
Note:  The decorative mirrors, hung on the opposite wall (above the towel rack), reflect this light and make things even a bit brighter.
When we measured to determine where to place the light, we discovered that a wall stud was in the exact space - just wall behind the mirror - where we needed to install a junction box.  A regular junction box is too deep and would not fit - and we were not about to cut into the wall stud.  Argh!  Luckily, there is a solution for this issue - a pancake box, or steel, round ceiling pan, fits in the narrow space in front of the stud, flush with the drywall.  Who knew?  My husband knew, that's who.
We needed a pancake junction box to install vanity lighting.
So, after switching off power to the room, he cut a hole for the new wall fixture, re-routed the wiring from the ceiling light to the wall fixture, tucked the connections in the pancake  junction box (it's a tight squeeze!), tightened the fixture and installed the light bulbs.  Once the power was turned back on, we verified it all worked and  installed a new ceiling tile in the space where the flourescent light occupied.

Extra light created by reflections in the mirrors.
New ceiling tile installed.
This project took all of about 25 minutes to complete.  You would never even know the fluorescent light had once lit that bathroom.

Refresh Six: Mirror
We opted to save money by working with the existing plate glass mirror.  Like we'd done in other projects, we planned to frame the mirror out with wooden trim molding.
Refresh Six:  Mirror

We purchased molding and L-brackets at the home improvement store, measured and cut the wood, painted, and strengthened the frame using the L-brackets.  We attached the assembly to the mirror using clear silicone adhesive.  Clamps held it in place while it dried.
We painted both sides of the molding with two coats of paint
Waiting for the caulk to dry.
This project cost less than ten dollars to complete.  It was completed over the course of a couple of days - we had to wait for the paint to dry.

The Finishing Touches:  Art Work
The final consideration for this project was what to hang on the walls.  We reused inexpensive circle artwork and frames, created original photos, and bought mirrors.  Each item shared the common accent color, black, and tied into an overall plan for the bathroom.  We spent very little money and achieved a big impact.  Perfect!
 Purchased mirrors - the Martha Stewart collection
Printed image (from the Internet) displayed in a re-purposed frame 
Printed image (from the Internet) and close-up photos of the tile mosaic displayed in a re-purposed frame.
Tryptic of Black Circle Artwork re-used from previous bathroom design.
Bathroom Refresh Complete
We're done!  In just a few days, we were able to refresh the tired basement bathroom and make it a stylish, super functional room.  The Before And After Shots below are a nice reminder that sometimes a little refresh can make a huge difference!


We have guests visiting this weekend, we are so glad the updates are complete!

And, as for the old countertop, sink, and lighting fixture?  Not to worry.  We brought them to our neighborhood donation center.
Dropping off the old fixtures
 They may not fit our taste anymore, but they are functional and can live on in another home or office.

Tuesday, July 31, 2012

Updating a Backsplash Using Tile


This past weekend we added a tile backsplash to our basement bar.  The project came about when I casually asked my husband if he thought our tumbled Travertine tiles (a previous garage sale buy) were the right size to fit in our basement bar's narrow backsplash area.  Ever the good sport, he brought a few tiles out of storage so we could see.  We determined that they would fit perfectly, began discussing options and, before we knew it, were midway through another project.  Yes, it was a bit impulsive.  However, we already own tiling supplies, did not have any major plans for Saturday (aside from watching some Olympics action on T.V.), and the kids were off with friends.  So, we were able to dig right in.

We made just two trips to the home improvement store - for grout, a wider outlet cover, and 12" x 1" crown molding tile.  By Sunday afternoon, we had a beautiful backsplash and an updated bar area.    

Keep reading to see how we did it.

But, First, A Few Notes on Tiling Supplies:
How much Tile?
As I mentioned, we already had tile when we began this backsplash project, it was left over from the two boxes of 3" x 3" tumbled travertine tiles and one sheet of 1" x 3" travertine mosaic tiles at a garage sale earlier this year.  After completing a planter box cover project, we still had 1 1/2 boxes remaining.  So, the only tiles we needed to purchase for our project were three pieces of 12" x 1" travertine molding - used as a finishing touch.
To determine how much tile you will need for your specific project, measure the length and width of the area you want to cover.  Multiply length times width to determine square footage.  Most boxes of tile will specify how many square feet one box will cover.  Be sure to purchase ten to fifteen percent more tile than you need to account for those broken or damaged in transit or during the install process.

Adhesive Tile Setting Mat or Thin Set Mortar?
I've read many, many reviews of tile setting mat products - both good and bad.  A tile setting mat, while more expensive than traditional mortar, is a great choice for small, DIY projects.  It's mess-free to install and allows you to tile and grout immediately (no set up time).

This was our second time using the adhesive tile setting mat.  We've had great results and have never experienced the sagging, peeling and detaching tiles mentioned in negative product reviews.  Based on my research and personal experiences, I offer up the following suggestions to anyone choosing to use adhesive tile setting mats:
  • Properly clean the wall and backsplash surfaces before use.  
  • If you are applying to a wooden surface, or a surface previously painted using with high gloss paint, sand the surface before cleaning.
  • Remove any air bubbles after applying the mat and press the mat firmly with the grout float to adhere it to the surface before you remove the plastic covering.
  • Make sure the backs of the tile are clean and free of dust before applying to the mat.  
  • If using mosaic segments cut from a larger sheet of mosaic tile, be sure to trim the webbing material as close to the tile as possible. And, press the tiles in firmly with the grout float to adhere.
  • Grout within 24 hours of install.
As with any project, consider your specific tile application, do your research, and trust your gut.  If you have ANY doubts, go with the tried and true (though messier) thin set mortar.  As for me, I will absolutely continue to use an adhesive tile setting mat for small tiling jobs.

How to Tile a Backsplash

Materials:
  • Tile of your choice 
  • Adhesive tile setting mat or thin set mortar
  • Measuring Tape
  • Scissors
  • Level(s)
  • Tile Spacers
  • Premixed tile grout or grout mixture
  • Grout float
  • Trowel (optional)
  • Bucket
  • Sponge
  • Latex or rubber gloves
  • Tile Cutter or Tile Saw
  • Tile Nipper
  • Hacksaw and vice (for thick trim tile)
  • Painters tape and paper/drop cloth/plastic bags - to protect surfaces while grouting
  • Tile sealer
Some of the supplies needed for the job
General How To:
Design and Place Tile
  • Lay out the tiles, or dry fit the tiles, using tile spacers, to verify spacing and quantity of tiles needed.
    Note: This step is very important!  Pay attention to corners, electrical outlets, phone jacks, etc.
Work out design and placement challenges before attaching tile! 
  • Measure, cut and apply the tile setting mat according to manufacturer's directions.
Be sure the surface is clean and dust-free before adhering adhesive mat.
  • Place tiles on the adhesive.
    Note:  Place all the full-sized tiles first.  Then, measure, cut and place the partial tiles.
    Note:  We doubled up tile spacers along the bottom of the tiles, where they met the counter top. 
The first, whole tile placed flush to the backsplash edge.
Tile spacers ensure grout lines are consistent.
  • Measure and cut partial tiles as needed.
    Note:  We used a tile cutter, tile nippers and a hacksaw for various cuts on this project.
    Note:  This is the step at which you will appreciate purchasing extra tiles!
Tile cutter is great for straight cuts on wall tiles.
  • Place partial tiles to complete design.
    Note:  We pressed firmly on all tiles after double-checking the look.  The goal is firm adhesion to the tile setting mat.
Tiles are placed and ready for grout.
Result:  Design and tile placement done.  Or is it?
This is the point at which I thought we were stopping.  And I was happy with the design - straightforward, clean, single run of tile.  Of course, then my husband presented me with the single, 12" x 12" sheet of travertine mosaic.  I forgot we had that.  Hmm...
Travertine mosaic?  Yes, please!
This changed everything.  We still had a few sheets of tile setting mat left, which meant we could add mosaic tile to the backsplash.  We played around with the placement and decided that a triple run of mosaic would meet up with the wall just above the bar counter.  Hmm...
Playing around with placement to add to the design.
The mosaic looked so good, we thought we'd add two more rows of square tiles.  This would bring the tile just to the floating shelf.  Hmm...

Note:  Because the tile now goes around a light switch and outlet, we trimmed tile with tile nippers.  Take a look at Tiletools.com for tips on when and how to best use tile nippers.

Tile nippers are good for 'nipping' small pieces off a tile.
Fifteen to twenty minutes of nipping later, we had the tile nicely placed around the outlet and light switch.  Now, how to finish things off?  We opted to add a single run of mosaic, followed by a run of 12" x 1" crown molding.  This brought the tile to just under the intercom speaker.
Note:  We cut two pieces of the12" x 1" crown  molding tile - one for each side of the floating shelf.  The crown molding tile was too thick for the tile cutter, so we held it steady in a table vice and used a hacksaw.  It was the perfect solution for the cut.
A table vice holds tile in place while cutting with hacksaw.
Result:  Tile design and placement done.  Phew.
Except it still was not quite done.  Upon review, the tile seemed a bit awkward around the floating shelf.  We had not intended to move the shelf, but now, we realized it had to happen.
Still not quite right.
So, we moved the floating shelf up approximately six inches, making room for a solid run of both the mosaic and finishing molding.  If we're going this far, we may as well do a complete job.  What a great decision.  It looked much better!
Final backsplash placement.
Result:  Now the tile design and placement is complete.  Bring on the grout!

Grout Tile

  • Protect the area using paper, drop cloth, etc.

Prep area before applying grout.

  • Inspect all joints to make sure they are clean and free of debris.
  • Prepare grout.
    Note:  We used premixed grout, rather than powdered grout, for this small project.  To learn more about choosing a grout, applying grout, and caring for grout, check out the great information on How To Do Things
  • Apply grout with a grout float and, if needed, a trowel.  Work grout completely into the joints.
    Note:  Use the edge of the grout float to gently scrape grout off the tile faces as you go, being careful to not gouge the joints.

Wear plastic gloves - grouting can get messy. 

  • Allow grout to set up, or cure.  Refer to manufacturer's recommendations.  
  • Dampen a sponge in clean water and gently wipe tile surface in a circular motion to clean.
    Note:  Rinse the sponge and change water often.   We changed water three times for this project.   

A large sponge with rounded edges works best when grouting.
  • Gently run the sponge along all grout lines to shape the lines as desired.
    Note:  Most pros shape the grout lines just a scant amount below the tile surface, while leaving the tile edges still covered.
  • Allow the grout to cure completely.
  • Use a dry, soft cloth to buff the tile surface and remove any residual haze.
    Note:  After a couple of days, we'll seal the grout lines to protect it from spills, stains, etc. 
Grouting complete!
  • Reattach the electrical outlet plates/switch covers, adjusting the outlet and/or switch forward as necessary.
    Note:  We purchased a slightly larger switch cover to cover up grout lines.  Luckily, switch covers are very inexpensive.
    Note:  We also rehung our floating shelf at this point.
    Result:  You're done!  Stand back and behold the beautifully completed backsplash!

Project backsplash complete!
Nice transformation.
We love our new backsplash!  This project proved to be low cost and high impact - just our style.  

An Added Bonus:
When we added the final design alteration in the basement, we were left with odd pieces of the 12" x 1" molding tile.  This was not wasted.  We used it to embellish our kitchen backsplash, which features the same tumbled Travertine tiles.  Take a look below:
Kitchen backsplash before...
And, after.
I have a feeling that we'll be tiling again soon.  As I mentioned at the beginning of this post, we've already discussed the possibility of adding larger tiles to the lower wall behind the bar, creating a chair rail and continuing the backsplash design along the length of the wall.  

Hmm...you better stay tuned.