Showing posts with label cooking. Show all posts

Tuesday, September 25, 2012

Small Bite, Big Hit: Asian Lettuce Wraps

Asian Lettuce Wraps:  Small Bite; Big Hit
This past weekend, I prepared my favorite Asian Lettuce Wrap recipe for Friday Night Happy Hour.  These small bites are packed with flavor and remind me of those we enjoy at our favorite restaurants.  To me, the perfect appetizer, or small bite is one that you can easily put together, accepts ingredient substitutions without losing integrity, is full of flavor, and is healthy.  My Asian Lettuce Wrap recipe is all this and more.

Ingredient Substitutions:
Dietary restrictions?  Forgot to buy fresh onions?  Cannot find an Asian ingredient in your local store.  No worries!  This recipe, while already dairy free, lends itself perfectly to other ingredient substitutions.  Here are a few that you can try without sacrificing a single ounce of flavor:

  • Ground Meat:  This recipe tastes great whether you use ground chicken, turkey, beef or pork.
  • Lower Sodium Soy:  Trying to watch the sodium?  One big way to do this when going Asian is with Bragg's Liquid Aminos.  One serving contains only 160 mg sodium.  This is much lower than what other companies report.  Try substituting regular soy sauce with this product and see what you think.  
  • Gluten Free Ingredients:  Fifteen percent of the U.S. population are currently sensitive to gluten.  And, many of those people enjoy the Asian flavor profile.  So, what to do?  Substitute with a gluten-free brand sauce, such as Kikkoman's Gluten Free Soy Sauce or Premier Japan Hoisin Sauce.  
  • Fresh or Frozen Veggies:  No doubt that fresh, in-season vegetables are always best.  However, frozen onions, soup blends, etc. can absolutely be substituted.  When the frozen vegetables are on sale, grab a few mirepoix bags to keep on hand.  This recipe already calls for a bunch of chopping - a bit of frozen, chopped onions will save a few of those chops!  

The next day, leftover lettuce wraps were gobbled up as lunch.  You know you have a good recipe when it tastes just as yummy in leftover format! If you want to try them for yourself, keep reading to learn how I make my lettuce wraps:

Asian Lettuce Wraps
Ingredients:
  • 1-2 Heads Butter Lettuce (also called Boston Bibb Lettuce)
  • 1 pound Lean Ground Meat
    Note:  I used ground chicken this week.  I've made this recipe with ground beef and ground pork - they work well too.
  • Cooking Oil or Cooking Spray
  • Six ounces Mirepoix
    Note:  Mirepoix  blend frozen vegetables are always in my freezer.  Feel free to substitute the following chopped vegetables:
    *One medium white onion
    *One large carrot
    *One celery stalk
  • 2 cloves Garlic, minced
  • 1 Tablespoon Soy Sauce
    Note:  I use Bragg's Liquid Aminos instead of Soy Sauce in all my cooking.
  • 1/4 cup Hoisin Sauce
  • 2 Tablespoons Crystalized Ginger, minced
    Note:  My original recipe called for pickled ginger.  I could not find it, so I substituted crystalized ginger.  
  • 1 Tablespoon Rice Wine Vinegar
  • A few dashes Asian Chile Pepper Sauce, such as Siracha Sauce
  • 8 ounces Water Chestnuts, drained and finely chopped
  • 1 bunch Green onions, chopped
  • 2 teaspoons Dark Sesame Oil  
Ingredients: Prepped and ready to go
General How To:
  • Rinse the lettuce and pat it dry or dry in a salad spinner.
Lettuce leaves, rinsed and dry
  • Chop or mince all your vegetables and have them ready to go:
    Note:  If preparing a fresh mirepoix, chop the onion, carrots and celery at this point as well.  
Chopped Garlic, Sugar Ginger, Water Chestnuts and Green Onion
  • Heat cooking oil or cooking spray in medium pan and brown the ground meat, stirring often.  Drain the fat and set the meat aside to cool.
Brown the ground meat over medium heat
  • Return the pan to cooktop.  Add mirepoix and cook, stirring frequently.
    Note:  You want the vegetables to cook, but not brown.
Cook Vegetables in same pan.
  • Add the following ingredients:  Bragg's Liquid Aminos (or soy sauce), Hoisin Sauce, Garlic, Ginger, Vinegar, Chile Pepper Sauce (or Siracha).  Stir to combine.
    Note:  Need to go gluten free?  Substitute gluten-free soy sauce and gluten-free hoisin sauce.   
  • Stir in the water chestnuts, green onions and sesame oil.  Cook until the onions are just beginning to wilt.
Cook until the green onions begin to wilt.

  • Add the ground meat and stir to combine.  Heat until all is warmed through.

All ingredients added:  It smells so good!

  • Arrange lettuce leaves around the outer edge of a large plate or platter.  Place the filling in the center. 

Presentation looks as good as it tastes!

  • Spoon some filling on a lettuce leaf, wrap it up and eat.

Yum!
The mixture is moist and  flavorful - so yummy.  However, some people love to sauce it up.  Want a dipping sauce?  Here's my standard dipping sauce recipe:

Dipping Sauce for Asian Lettuce Wraps:
Ingredients:

  • 1 teaspoon Sesame Oil
  • 2 teaspoons soy Sauce (or Bragg's Liquid Aminos)
  • 2 teaspoons Rice Wine Vinegar
  • 1 Teaspoon Asian Chile Pepper Sauce
  • 1 dash Sugar
  • Garnish (I show a few cilantro leaves)

Dipping Sauce Ingredients

General How To:

  • Mix all ingredients together and serve in small bowl for dipping.
So, there you go.  Small Bites that are a Big Hit!  Try the recipe out yourself and let me know how you like it!

Thursday, August 16, 2012

Cook Some, Freeze Some: Chicken Enchiladas

Cook Some, Freeze Some
Tonight I'm serving enchiladas - a favorite baked comfort food to which I applied my 'cook one, freeze one' method.  With the enchiladas, though, it's more of a 'cook some, freeze some' method.  I cooked a double batch of enchiladas a couple of weeks ago and froze some for later use.  Tonight is a night I need a quick dinner solution, so I am pulling some enchiladas out of the freezer for my husband and I.  The 'don't like spicy food' and 'refuse to eat meat' members of the family will enjoy an entree of cheese quesadillas.  We'll round out with a green vegetable and cuditee (the kids don't like salad either).

Cook Some/Freeze Some:
I use this method of meal preparation all the time.  Some call it investment cooking.  Others call it freezer cooking or make-ahead meals.  Whatever term you use, if you have the freezer space, it just makes sense to cook one and freeze one.  I often prepare double recipes of taco meat or sloppy joes to have on hand.  I do the same whenever I prepare pasta bake, chili and soups.

A word on Mexican Ingredients:
I am not Mexican, nor did I marry into a Mexican family.  I grew up in the Midwest, and did not even eat a  taco until age eight.  So, while I have traveled to Mexico, and have eaten fabulous authentic Mexican food on both sides of the border, I typically reach for flour tortillas over corn tortillas.  Much spirited debate exists over one should use corn or flour tortillas for enchiladas.  I use flour.  Feel free to use whatever you want.  I have the same sentiment with enchilada sauce.  Of course homemade chili gravy is better - especially a recipe passed down from generation to generation.  However, I do not usually have the time to make my own gravy and am perfectly happy using canned sauce from the grocery store.  Over the years, I have tried just about every red and green sauce on the market, from Mexican brands to store brands; organic to mass-produced.  While those produced by Mexican brands are my favorite, I use whichever sauce I have on hand.

Most Mexican restaurant menus feature at least 10+ varieties of enchiladas.  I make my enchiladas using rotisserie chicken flavored with fresh salsa, jalapenos, and (when I can get away with it) mushrooms or black beans/spinach.  The basic enchilada recipe lends itself to a variety of substitutions/combinations based on preference or dietary restrictions.  For a dairy-free diner, use soy- or rice cheese.  For gluten-free diets, use gluten-free tortillas and sauce.  Prefer beef, pork, seafood?  Want to sneak in more vegetables?  Care to control how much spice in dish?  You can do all this with a basic enchilada recipe of tortilla, protein, vegetable, cheese, sauce.

Keep reading to see how easy I cook some and  freeze some of my enchiladas:

Chicken Enchiladas:

Ingredients:
  • Two pounds Shredded Chicken.  I  pick and shred the meat from one rotisserie chicken.
  • One large can (20 oz) Enhilada sauce.
  • One container (16 oz)  Salsa.  I use 16-oz container of my 'go-to' salsa.  Any fresh or jarred salsa works.
  • One small can (4 oz) Chopped Jalapenos or Green Chiles.  I use jalapenos - we like heat.
  • Two cups Shredded Cheese.  I use a Four-Cheese Mexican blend.  
  • Twelve 8-inch Flour tortillas.  I used 8" flour tortillas from my 'go-to' brand.  
  • Cooking Spray


General How To:
  • Pick meat from a rotisserie chicken.  Shred the meat and remove any residual bones.  Place to the side.
    Note:  Grocery stores always have rotisserie chicken available.  It is a huge time saver.  
Rotisserie chicken picked and ready to go.
  • In a large bowl combine the chicken, salsa, 1/2 cup of Enchilada Sauce, 1/2 cup cheese, and the jalapenos.
    Note:  Add, delete, substitute any ingredients at this point to craft your perfect enchilada.  
Mix all the ingredients to combine.
  • Spray a cooking dish with non-stick spray.  Pour some (about 1/4 cup) enchilada sauce on bottom of pan.
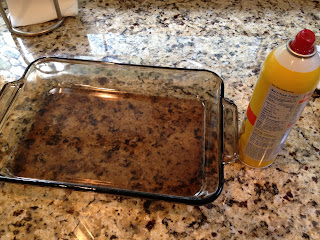
Non-stick spray helps remove the enchiladas after baking.
  • Spoon some filling (1/4 to 1/3 cup) onto each tortilla.
    Note:  If you want to be really authentic, dip each tortilla in enchilada sauce before filling.  
This step can get messy - work over the bowl.
  • Fold the tortilla into a tube shape and place seam-side down in baking dish.  Repeat with remaining tortillas.
    Note:  It's fine to crowd the enchiladas in the dish.
  • Pour remaining sauce over the rolled enchiladas and top with cheese.
Ready for the oven.
Cook Some:
  • Place baking dish in a 350-degree oven and bake for about 25 minutes, or until the cheese is melted.
    Result:  The enchiladas are cooked through and dinner is ready!  
Enchiladas cooked and ready to eat!
Freeze Some:
After dinner has been served, it's time to freeze some enchiladas for later.  Here's how I process the enchiladas for future meals:

  • Place two enchiladas a sheet of foil and wrap tight.  Repeat with remaining enchiladas.

Freeze individual portions of enchiladas for later.

  • Place the wrapped packs of enchiladas in a zipper freezer bag and label appropriately.

Ready for the freezer

  • Place the bag in the freezer.
    Result:  You are done.  Pat yourself on the back for your foresight and ability to plan ahead.

When you are ready to use the enchiladas, simply remove them and defrost.  Then, heat them up in the oven - conventional, toaster or microwave - and serve.  So easy.  So good.  

And, the Picky Eaters?
I told you the kids usually don't like what we like, right?  Cheesy quesadillas take just a few minutes and can be customized to accomodate all dietary restrictions.  Everyone's happy!
Quesadillas made easy! 

Thursday, July 26, 2012

An Easy Marinade Recipe: 3-3-2-1 And Done!

I always separate bulk meats, purchased from the grocery store or warehouse club, into 1-2 pound packs, label them, and store them in the freezer. Some packs are stored in marinade, which makes future meal preparation even easier.

When I prepare marinades, I use the same basic recipe - I just switch up the seasoning mix based on the flavor profile.  I remember the marinade recipe as 3-3-2-1, which refers to the proportions of the four main ingredients.  Three parts seasoning; three parts oil; two parts soy; one part vinegar.  This combination makes a really great marinade!


Keep reading to learn how to create the basic 3-3-2-1 Marinade combo for one pound of meat.   


Making a Marinade
Marinade Ingredients
Ingredients:
3 Parts Seasoning Mix
3 Parts Oil
2 Parts Soy Sauce (or Bragg's Liquid Aminos)
1 Part Apple Cider Vinegar

Tips and Hints:

  • For each one pound of meat, I use 3 tablespoons seasoning mix, 3 tablespoons oil, 2 tablespoons Bragg's and 1 tablespoon cider vinegar.
  • The picture above shows a Store Brand spice blend.  I've used a variety of spice mixes over the years:  those I've created from scratch, purchased from specialty shops, grocery stores, Farmer's Markets, etc.  In this recipe, you can use whatever mix you desire - just be sure to use 3 parts worth.
  • I use Bragg's Liquid Aminos, rather than soy sauce, for all my cooking- it contains less sodium. 
  • Any Oil will do.  I was raised in an Italian household, so I always use Extra Virgin Olive Oil with my marinades.  If you prefer Canola Oil, that works well too.
  • Feel free to add marinade ingredients directly to the zipper-sealed bag.  It saves some cleaning.
  • Let the meat sit in the marinade for at least one hour before cooking.  You can store it overnight in the refrigerator, or freeze for future use.  

Add the ingredients directly to a storage bag to  reduce mess. 
Massage the marinade into the meat; seal the bag tight and label  before storing.
Grilled Jamaican Jerk Flank Steak.  Yum!
Super easy, super yummy.  Every time.  Try the marinade recipe soon and let me know how you like it!

Wednesday, May 30, 2012

Cook One, Freeze One: Italian Pasta Bake

It's the beginning of the summer in Atlanta and already warming up.  Leave it to my kids to request pasta for dinner this evening rather than something from the grill.  I chose to make my Italian Pasta Bake, which is similar to my lasagna, and just as much a 'fan favorite' -- How can you go wrong with pasta, sauce and cheese?  However, since we are already full-swing into a busy summer, I chose to cook one and freeze one.
Cook One/Freeze One:
I am making a double batch of of my Italian Pasta Bake.  One batch is tonight's dinner, and one batch goes into the freezer for use in a week or two (when I could really use a quick dinner solution).  Some call this investment cooking.  Others call it freezer cooking or make-ahead meals.  Whatever term you use, if you have the freezer space, it just makes sense to cook one and freeze one.  I often prepare double recipes of taco meat or sloppy joes to have on hand.  I do the same whenever I prepare chili and soups. 

A Word on Italian Ingredients:
I grew up with Sicilian grandparents who served hand-crafted dishes that were prepared from scratch.  As a kid, I learned to make my own noodles and bread, dry my own herbs, and can my own vegetables.  Suffice it to say, if my grandparents did not grow it or see it before it was butchered, they were not going to serve it at their table.  Exceptions to the rule were rare, and only included items that were sourced from well-researched vendors.  For example, they ordered table grapes and olive oil from a specific farm in CA; Parmigiano-Reggiano and Romano from specific local vendors, and cannoli and Casata cakes, if they did not make it homemade, from one, specific bakery.

The world is much 'smaller' now and grocery stores stock really great ingredients.  I do occasionally make homemade sauce, dough, etc.  And, I grow my own herbs.  However, most of the time, I am perfectly fine with serving my family boxed pasta, jarred sauce, and frozen tortellini.  Below is my recipe for the Italian Pasta Bake.  Keep reading to see how I made it:
  
Italian Pasta Bake

Ingredients:

  • 2 pounds of pasta
  • 2 14-oz jars Pasta sauce
  • 2 pounds ground meat.
  • 2 cups Shredded mozzarella (or any Italian cheese combination)
  • 1/2 cup Parmesan cheese - or Parmesan/Romano blend
  • 2 small cans of Mushrooms
  • Italian-flavored Croutons (optional)
  • Italian Seasoning Mix (basil, oregano, garlic, parsley) to taste
  • Sea Salt or Kosher Salt 
  • Ground Black Pepper
Note:  Of course you should substitute fresh ingredients when possible.

General How To:

  • Boil pasta in large pot of boiling, salted water according to package directions.  Drain, and return to the pot.

Drain and rinse pasta to remove excess starch.
  • Season and brown the ground meat.
    Note:  I used ground venison (a friend of ours shared his hunting bounty).  I had it on hand and it works great in this dish-it's so lean.  Traditionally, I would use a combination of lean ground pork and ground beef.
    Note:  I use Sun of Italy Italian Spice Mix in just about everything I cook - it seems to be the closest to my grandparent's spice blend.  A good mix of sweet basil, oregano, parsley, garlic works well too.
Season the meat as it cooks to infuse flavor.
  • Drain excess fat from ground meat and add the meat to the pasta pot.
    Note:  Excess Cooking grease is horrible for pipes, drains and septic systems.  Keep an old glass jar or coffee tin under the sink in which to store the grease.  When the container is full, toss it in the household garbage. 
Keep a jar under the sink for excess cooking grease/fat. 
Add the meat to the pasta.
  • Add the mushrooms, 1 cup of mozzarella, 1/2 cup Parmesan, and 1 1/2 jar sauce to the pot.  Mix to combine.
    Note:  Once mixed, add more sauce to taste.  Some like it saucier than others.
  • Prepare two 9" x 13" baking dishes:  Line one with aluminum foil, leave one as is.   Divide the mixture evenly between the two dishes.
Line one pan with foil - you will freeze this half of the mixture.
One for later, one for now.
Cook One - For tonight's dinner:
  • Place about 1/2 - 1 cup Italian croutons in a plastic bag and crush.
    Note:  I used one of the pasta jars to crush up the croutons.
Croutons - not just for salads
  • Sprinkle the pasta that you will serve today with more shredded cheese and the crushed croutons to make a crunchy topping.
Topped with cheese, croutons, and a bit more parsley.
  • Bake in a 350 degree oven for 25 minutes or until the cheese looks melted.

  • Serve with a healthy salad or green vegetable and enjoy!
Freeze One - For Later On:

We said we'd freeze one.  Here's how I processed the second pan of pasta bake for later:
  • Cover the pasta completely with foil and store in the refrigerator overnight.
    Note:  This cools/sets the pasta so you can work with it the next day.
Cooling the second pan of pasta in our basement refrigerator.
  • The next day, remove the pasta (in the foil liner) and wrap it in plastic wrap. 
The foil liner keeps the baking dish clean.
  • Wrap the pasta 'package' well in another layer of foil.
  • Note:  You can also use a zipper freezer bag.  I will be using the pasta in a week or two, so foil and plastic wrap is sufficient. 
Ready for the freezer
  • Place the pasta in the freezer for later use.
I will freeze this for no more than two weeks.
When you are ready to use the frozen pasta, simply remove it from the freezer and thaw it in the refrigerator for about 24 hours.  Then, unwrap the top wrapping and place back in the baking dish (in the original foil liner).  Add toppings, bake and serve!
As I mentioned, this dinner is a 'fan favorite.'  The kids did, indeed, ask for seconds.  And, they want to have left-overs tonight...that's a winner in my book!