Tuesday, September 25, 2012

Small Bite, Big Hit: Asian Lettuce Wraps

Asian Lettuce Wraps:  Small Bite; Big Hit
This past weekend, I prepared my favorite Asian Lettuce Wrap recipe for Friday Night Happy Hour.  These small bites are packed with flavor and remind me of those we enjoy at our favorite restaurants.  To me, the perfect appetizer, or small bite is one that you can easily put together, accepts ingredient substitutions without losing integrity, is full of flavor, and is healthy.  My Asian Lettuce Wrap recipe is all this and more.

Ingredient Substitutions:
Dietary restrictions?  Forgot to buy fresh onions?  Cannot find an Asian ingredient in your local store.  No worries!  This recipe, while already dairy free, lends itself perfectly to other ingredient substitutions.  Here are a few that you can try without sacrificing a single ounce of flavor:

  • Ground Meat:  This recipe tastes great whether you use ground chicken, turkey, beef or pork.
  • Lower Sodium Soy:  Trying to watch the sodium?  One big way to do this when going Asian is with Bragg's Liquid Aminos.  One serving contains only 160 mg sodium.  This is much lower than what other companies report.  Try substituting regular soy sauce with this product and see what you think.  
  • Gluten Free Ingredients:  Fifteen percent of the U.S. population are currently sensitive to gluten.  And, many of those people enjoy the Asian flavor profile.  So, what to do?  Substitute with a gluten-free brand sauce, such as Kikkoman's Gluten Free Soy Sauce or Premier Japan Hoisin Sauce.  
  • Fresh or Frozen Veggies:  No doubt that fresh, in-season vegetables are always best.  However, frozen onions, soup blends, etc. can absolutely be substituted.  When the frozen vegetables are on sale, grab a few mirepoix bags to keep on hand.  This recipe already calls for a bunch of chopping - a bit of frozen, chopped onions will save a few of those chops!  

The next day, leftover lettuce wraps were gobbled up as lunch.  You know you have a good recipe when it tastes just as yummy in leftover format! If you want to try them for yourself, keep reading to learn how I make my lettuce wraps:

Asian Lettuce Wraps
Ingredients:
  • 1-2 Heads Butter Lettuce (also called Boston Bibb Lettuce)
  • 1 pound Lean Ground Meat
    Note:  I used ground chicken this week.  I've made this recipe with ground beef and ground pork - they work well too.
  • Cooking Oil or Cooking Spray
  • Six ounces Mirepoix
    Note:  Mirepoix  blend frozen vegetables are always in my freezer.  Feel free to substitute the following chopped vegetables:
    *One medium white onion
    *One large carrot
    *One celery stalk
  • 2 cloves Garlic, minced
  • 1 Tablespoon Soy Sauce
    Note:  I use Bragg's Liquid Aminos instead of Soy Sauce in all my cooking.
  • 1/4 cup Hoisin Sauce
  • 2 Tablespoons Crystalized Ginger, minced
    Note:  My original recipe called for pickled ginger.  I could not find it, so I substituted crystalized ginger.  
  • 1 Tablespoon Rice Wine Vinegar
  • A few dashes Asian Chile Pepper Sauce, such as Siracha Sauce
  • 8 ounces Water Chestnuts, drained and finely chopped
  • 1 bunch Green onions, chopped
  • 2 teaspoons Dark Sesame Oil  
Ingredients: Prepped and ready to go
General How To:
  • Rinse the lettuce and pat it dry or dry in a salad spinner.
Lettuce leaves, rinsed and dry
  • Chop or mince all your vegetables and have them ready to go:
    Note:  If preparing a fresh mirepoix, chop the onion, carrots and celery at this point as well.  
Chopped Garlic, Sugar Ginger, Water Chestnuts and Green Onion
  • Heat cooking oil or cooking spray in medium pan and brown the ground meat, stirring often.  Drain the fat and set the meat aside to cool.
Brown the ground meat over medium heat
  • Return the pan to cooktop.  Add mirepoix and cook, stirring frequently.
    Note:  You want the vegetables to cook, but not brown.
Cook Vegetables in same pan.
  • Add the following ingredients:  Bragg's Liquid Aminos (or soy sauce), Hoisin Sauce, Garlic, Ginger, Vinegar, Chile Pepper Sauce (or Siracha).  Stir to combine.
    Note:  Need to go gluten free?  Substitute gluten-free soy sauce and gluten-free hoisin sauce.   
  • Stir in the water chestnuts, green onions and sesame oil.  Cook until the onions are just beginning to wilt.
Cook until the green onions begin to wilt.

  • Add the ground meat and stir to combine.  Heat until all is warmed through.

All ingredients added:  It smells so good!

  • Arrange lettuce leaves around the outer edge of a large plate or platter.  Place the filling in the center. 

Presentation looks as good as it tastes!

  • Spoon some filling on a lettuce leaf, wrap it up and eat.

Yum!
The mixture is moist and  flavorful - so yummy.  However, some people love to sauce it up.  Want a dipping sauce?  Here's my standard dipping sauce recipe:

Dipping Sauce for Asian Lettuce Wraps:
Ingredients:

  • 1 teaspoon Sesame Oil
  • 2 teaspoons soy Sauce (or Bragg's Liquid Aminos)
  • 2 teaspoons Rice Wine Vinegar
  • 1 Teaspoon Asian Chile Pepper Sauce
  • 1 dash Sugar
  • Garnish (I show a few cilantro leaves)

Dipping Sauce Ingredients

General How To:

  • Mix all ingredients together and serve in small bowl for dipping.
So, there you go.  Small Bites that are a Big Hit!  Try the recipe out yourself and let me know how you like it!

Thursday, September 20, 2012

Laundry Room Update: Glass Mosaic Backsplash

Final Phase:  Installing Glass Mosaic Tile Backsplash
This post discusses phase five, the final phase (finally!) of our laundry room update:  How to Tile a Glass Mosaic Backsplash.  Previously, we completed the following updates to the laundry room:
I got my first real dose of installing tile this spring, when we tiled the backsplash of our basement bar.  As soon as we decided to install a new countertop in the laundry room, I suggested that we use tile as a backsplash material.  Why?  I gave my husband the following reasons:
  • Tile is a decorative way to disguise drywall surface flaws left after the countertop installation.
  • A tiling project would be inexpensive - we already had  the majority of tools and supplies needed.
  • I wanted to practice my tiling skills.
He agreed!  So, while at the home improvement store picking out the countertop, we also selected a coordinating tile and aluminum tile edge protector.  The tile we selected is called Luxor Valley Brick:
Tile selection coordinates well with counter and wall color
Not only does this glass and stone mosaic tile coordinate well with what we've already done, but the gray color and edge protector also tie in the stainless steel and works with the misty gray unsanded grout I already had on hand (from our bathroom tile project last month).  Perfect.

We originally agreed to tile only the backsplash.  But, later that evening, I took a really good look at the wall behind my washer and dryer.  The space between the cabinet and  over-washer/dryer shelf was almost exactly 12-inches - the same height as one sheet of tile.  Hmm...
Why not tile this wall  also?
I wedged the three sheets of tile in the space and discussed it with my husband.  He agreed that it looked really good.  So, back to the home improvement store I went.  Again!

It was the icing on the cake.  The tile turns an otherwise boring, utilitarian room into a room I do not mind other people seeing when the door is open!  I spent a total of three hours, split over the course of one day, to lay the glass mosaic tile and an additional hour to grout.  Keep reading to see how we did it!

But first, a few more thoughts on adhesive tile setting mats:
In my post from July, I explained how we tiled a backsplash using travertine tiles and an adhesive tile setting mat.  This laundry room project marks our fourth time using the product.  I am still a fan - for small projects!  The biggest advantage I have, as a mother to younger kids, is that I am able to lay tile while still taking parenting breaks (after-school activities, homework breaks, etc).  Mortar is not so flexible!  Or mess-free.

This time around, we also used a tile edge protector, which revealed a big disadvantage to using the adhesive tile setting mat.  Because the edge protector is installed behind the tile, using the edge protector with the mat meant that one row of tile projects forward ever-so-slightly more than the rest:
Before Grout: top row of tile rests slightly higher than other rows.
This bugs the perfectionist in me.  Had we used mortar, rather than the mat, we could have built up the surface to a consistent, level depth.  Bummer.
After Grout:  top row still slightly higher to the touch.
Next time, I'll know to use mortar if I am using uneven tile surfaces or the edge protector.  However, while I know this is a flaw, others do not really sense it.  And, it's the laundry room, after all.  I am O.K. with it being perfectly imperfect.  The room looks a million times better now than it did two weeks ago and functions wonderfully.  Nothing to complain about!  

If you opt to use the tile setting mat, please be sure to do the following:
  • Properly clean the wall and backsplash before use.
  • If you are applying the mat to a wooden surface, or a surface previously painted using high gloss paint, sand the surface lightly before cleaning.
  • Remove all air bubbles after applying the mat and press the mat firmly with the grout float to adhere it to the surface before you remove the plastic covering.
  • Make sure the backs of the tile are clean and free of dust before applying it to the mat.
  • Trim mosaic webbing material as close to the tile as possible.  And, press all the tiles in firmly with a grout float to adhere.
  • Grout within 24 hours of install.
Tiling a Backsplash Using Glass Mosaic Tile:

Materials:
  • 12" x 12" inch Mesh-mounted Mosaic Tile
  • Adhesive Tile Setting Mat
  • 1/2" Aluminum tile Edge protector
  • Non Sanded Grout
  • Pre-primed Quarter-Round Molding
  • Silicone Caulk
  • Ruler and Measuring Tape
  • Laser Level
  • Scissors
  • Exacto-knife and cutting surface
  • Grout Float and Sponge
  • Bucket or pail
  • Wet Saw
  • Hack Saw
General How To:
  • Calculate how much tile you will need to complete the job.
    Note: Our backsplash used about 2.5 sheets of the mosaic tile, and the wall behind the washer/dryer used up 6.5. 
  • Measure desired dimensions of tile installation and mark a level line on the wall surface(s) at the top of the backsplash.
    Note:  Cut around any electrical outlets, phone jacks, etc. Luckily, for this project, we had no obstacles!
  • Measure, cut and adhere adhesive tile mat to the wall surface(s) according to manufacturer's directions.
    Note:  The adhesive is very sticky.  Clean your cutting tools several time during the course of the project.
I drew a level line on both walls before adhering the mat.
  • While the plastic covering is still on the mat, dry fit the tile to determine how many rows of the meshed mosaic tile you need to adhere.  Trim excess rows using an exacto knife and a designated cutting surface.
Trim excess webbing as close to the tile as possible.
  • If using a tile edge protector, measure and cut it using a hack saw, miter saw, or snything else designed to cut metal.
    Note:  We cut it to create a 45-degree angle in the inside corner of the backspash.  For the other wall, we kept the straight edge.
  • Place all full tile sheets on adhesive and press firmly with the grout float to set.
    Note:  The tile edge protector is placed between the adhesive and the tile mesh.  Use an additional layer of adhesive between the edge protector and tile mesh to make sure the tiles stick.
All the full sheets of tile and edge protector are laid.
  • Measure and cut partial tiles as needed using the wet saw.
    Note:  For the most part, our cuts were half pieces.
    Result:  Tile is placed - time to grout!
One more cut to go!
  • Protect the area using paper, drop cloth, etc.
  • Prepare grout.
    Note:  We used a powdered, non sanded grout for this project, as recommended for use with glass tile.  The non sanded grout protects the glass surface.  The color we used was misty gray.
  • Apply grout with a grout float.  Work the grout completely into the joints.
    Note:  Use the float to gently scrape grout off the tile face as you go.  Be careful not to gouge the joints.
Wear gloves - grouting gets messy.
  • Allow grout to set up, or cure, according to the manufacturer's recommendations.
    Note:  We waited about 3 hours for the grout to cure.
  • Dampen a sponge in clean water and gently wipe the tiles in a circular motion.
    Note:  Rinse the sponge and change the water often.  We were really happy to have our new sink for this process!
We initiated the new laundry sink!
  • Allow grout to completely cure.
    Note:  We left it for 24 hours.
  • Use a dry, soft cloth to buff the tiles and remove any residual haze.
    Note:  As with other projects, we will wait a few days and then seal the grout lines.
  • To seal the joints between the tile edge protector and drywall, apply a bead of clear silicone caulk.
    Note:  To pretty up the joint where the tile meets the over the washer/dryer shelf, we added a run of quarter-round molding.
    Result:  You're tile job is complete!
New backsplash - LOVE it!
What a transformation!
Phew.  Another successful tiling job completed.  I cannot even believe how much this small addition jazzes up the room.  And, I cannot believe I went most of my life without tiling.  I cannot wait for the next tile project.  It's quickly become my favorite DIY project.

Finishing Touches:
Artwork:  There is just one more wall in this room that I have not updated.  I really could not let it go untouched.  So, I switched out my sunset photos for clothespins photos and rehung the frame next to the door:
Before:  Sunsets from a Jamaica vacation
After:  Clothespins, of course!
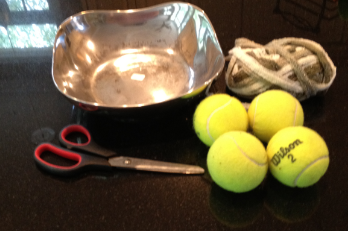
Balls of Yarn:  When I was shopping for accessories (yes, even for the laundry room), I felt inspired by old bobbins, spools, knitting needles, and balls of yarn, etc.  I decided to make my own little bowl of yarn balls:
Before:  You say tennis balls...I say yarn balls
I picked up some pretty yarn at the craft store, pulled old tennis balls out of the garage, and got to work.  I was able to make five 'yarn balls' for under five dollars!  The yarn was on sale, and I used a coupon.  The bowl, a Wilton Armetale bowl, was only only one dollar at an estate sale.  Quick, easy, and pretty:
After:  Pretty little bowl of yarn balls
And they are functional, too.  Once I set the dye by washing them in hot water, I can use them in the dryer for quick-drying, static-free clothes!

Above-cabinet Storage:  The room has high (10 foot) ceilings.  I took the storage vertical by placing plastic bins above the cabinets.  These bins, which I normally store in a coat closet, hold winter scarves, mittens, etc.  I use identical bins to store swim gear.  Moving the bins into the laundry room, above the cabinets, freed up valuable real estate elsewhere and optimized otherwise dead space.  I plan to switch the bins each season as needed.
Vertical Storage Optimized
And with that, we are DONE!  What did that room ever look like before?
Funny to think the entire project began because we just wanted a deeper sink.  Based on our Before and After Shots, the added effort was well worth it:


Five phases, completed over two weeks, was all it took to complete this laundry room update.  All because we did not like the shallow sink. 
Football season started, we have more visitors arriving, and the weather is finally cooling off in Atlanta.  Perfect timing for us to take a break from the DIY projects.  Well, maybe one weekend, at least!


Tuesday, September 18, 2012

Laundry Room Update: Color Matching Paint

Phase Four:  Color Matching Paint for Touch Ups
This post discusses phase four of our laundry room update:  Color Matching Paint.  Previously, we completed the following updates to the laundry room:
When we started on this odyssey, we simply wanted to replace a shallow sink with a deeper laundry tub.  Of course, it quickly became much more involved.  We replaced the countertop and window molding and realized we at least needed to touch up the paint on the walls and around the backsplash.  Then, we installed wall-mounted cabinets and realized we had even more touch ups to complete.  
New countertop profile does not match old countertop profile. 
We peeled a small bit of paint when removing window molding
We need to touch up spots left from shelving brackets
There was only one problem - we had no paint remnants for the laundry room and no idea what color of paint the previous homeowners used.  As most sellers do, the previous owners left us several remnant cans of leftover paint in the garage.  We looked through the cans several times, but did not find the color used in this room.  Because we did not intend to paint the entire room, a little color matching was now on the agenda!

How to Color Match Paint
We were hardly scientific in our paint matching methods - and ended up being very successful.  We were able to quickly figure out the specific paint color used in the laundry room and then purchase and use the paint to touch up the laundry room walls.  As it turns out, this color is used all over our house - it's the main neutral wall cover for the laundry room, hallways, master bedroom, and stairwell.  We really needed to have some paint on hand for touch ups!  Following are some of the steps we took to match the color:
  • Context Color Clues:  While looking through paint remnants in the garage, we noted that the majority of the paint cans were from the same manufacturer, Sherwin Williams.  This was good to know.  The previous owners seemed to have selected colors for the interior around the same time, and the colors selected seemed to be within the same color collection.  We concluded that, if we found the collection name, we would find the color for the laundry room walls within that collection.
Interior Paint Colors used by Previous Owners
  • Mobile Technology Tools:  Many paint manufacturers have released apps that will help homeowners match paint colors.  The mobile app developed by Sherwin Williams is called ColorSnap.  We downloaded this app to our mobile devices and then snapped a picture of the wall.  The app came back with a color it felt would be the closest match.  Great idea in theory.  However, our wall color looks different in natural and artificial light.  The app advised me the color was in the gray family.  I knew this was not true.
Match paint color using  picture taken with cell phone camera.
  • Paint Samples:  This old school method involves taking a sample from the actual wall you need to paint.  Paint vendors, in both home improvement and brand-specific paint stores, do a fantastic job matching paint samples for customers.  Lucky for us, we had the piece of painted drywall face paper that peeled off when we removed the original countertop.  If we did not have that sample, we could have used one of the following methods to provide the paint store with a small (2" x 2") sample of the paint color:
    *  Cut a small piece of drywall from behind a switchplate, phone jack plate or outlet cover
    *  Cut a small piece of face paper off the drywall or sheet rock from an inconspicuous area.
Drywall face paper with paint color
Armed with the paint color names used previously in the house, and my small paint color sample, I headed out to the paint store.  The clerk was very helpful and was able to make a pretty good color match using his computer system:
Color match sample with my paint chip - pretty close, eh?
He also was able to locate an older brochure, based on one of the color remnants in my garage. Sure enough, there was a color that seemed an almost sure bet for the laundry room color  It's called Wickerwork:
Color Matched!
I bought a quart of the color-matched paint and returned home to touch up the walls.  Well, actually, my husband did the touch-ups - I had to get dinner going!  He painted the wall behind the washer/dryer and the patch next to the countertop.  He also painted the backsplash, even though I intended to tile, because we wanted the wall color consistent behind the glass tile.  If we were not going to tile, we would want to sand the wall and really fix the line left from the previous countertop:
Touching up with color-matched paint.
Later, I labeled the container and added it to the collection of remnant paint in the garage:

Paint can labeled and ready for the next use.
Check back with me and my laundry room update.  I will share how I used glass and stone mosaic tile to really jazz up this room.

Laundry Room Update: Over the Washer/Dryer Shelf

Phase Three:  Install an Over the Washer/Dryer Shelf
This post discusses phase three of our laundry room update: Creating and Installing an Over the Washer/Dryer shelf.  Previously, we installed a new countertop and laundry room sink and replaced wire-mesh shelving with wall-mounted storage cabinets.

The idea of an over the washer/dryer shelf is not new.  We built one in our Savannah laundry room and loved it:
Inspiration: Over-the washer/dryer shelf in our old home
We just never got around to building a shelf in the new house.   I think I've procrastinated for the same reason we hadn't updated the rest of the room:  Because my dream has been to own a front-load washer/dyer combo, featuring a solid surface folding station built over top.  Or, a front-load washer/dryer combo stacked with ample room for kids' lockers and a broom closet.  All this dreaming of a front-load washer and dryer has kept me from optimizing the laundry room here in ATL.  Until last week, that is.  Last week, we installed the new laundry sink and set off on the path to a complete laundry room overhaul.  I finally accept the fact that, if I really wanted the stackable front-loaders, I would have gotten them by now.  I am committing to the top-loader washer we do have, which (by the way) does a fine job of cleaning the clothes.  So, it's time to optimize the space.

We built a 6-foot long, 8-inch-deep shelf and installed it over the washer and dryer.  A hole drilled through the shelf and an electric power strip attached to the underside enable us to neatly store and charge our Dustbuster in the laundry room.  We could also accommodate an iPod, clock, phone, etc.  Keep reading to see how we built this space-saving solution.

How to Build an Over the Washer/Dryer Shelf
Materials:
  • White Melamine Shelf - We bought a shelf that was 1" x 12" x 72".
    Note:  We chose melamine for this project for its smooth, white finish.  For more information on deciding between wood and melamine shelving, see my discussion in my post about the tiered multi-bin organizer.
  • 2" x 2" Pine furring strip, long enough to create a cleat underneath the back and sides of your shelf.   
  • Decorative Case Molding - To finish off the front of the shelf
  • Electric Power Strip (optional)
  • Drywall screws and anchors
  • Pencil or Pen
  • Measuring Tape or Ruler
  • Stud Finder
  • Laser Level
  • Miter Saw
  • Circular Saw
  • Drill and Drill Bits
  • Screwdriver
  • Hammer
  • Finishing nails
  • Caulk
  • Touch up paint
General How To:
  • Determine dimensions and placement of the shelf.
    Note: We designed a shelf that would meet the following criteria:
    *Span from wall to wall
    *Clear the top of the washer and dryer
    *Obscure the hoses and plugs behind the washer
    *Clear the washer lid when open.
    For our situation, we determined the shelf should be 72-inches long, 8-inches deep and approximately 46-inches high. 
Height of finished shelf
Shelf allows washer lid to open fully.
Shelf clears the top of the washer and dryer.
  • Use a laser level to mark a line on the wall at the desired height
    Note:  You will be attaching the furring strip flush with this mark.  The actual shelf surface will be about 3/4" above the 2" x 2".
  • Mark a spot every 12-inches or so along the marked line.   Use a stud finder to locate studs.
    Note: Since most wall studs are 16" on center, you must use a combination of drywall screws and regular screws with wall anchors.  The stud finder will also help locate duct work, plumbing, electrical, etc. that is in the walls.
  • Drill pilot holes and insert wall anchors as necessary.
Tap wall anchors in place using a hammer.
  • Measure and cut a piece of pine furring strip that measures the length of your shelf.
    Note:  We cut a 6-foot piece of furring strip using a miter saw.
  • Paint the strip to match your shelf color.
    Note:  We painted only the two visible sides of the wood.
2" x 2" furring strip
  • Dry fit your furring strip and mark the spots for the screws.
    Note:  These marks should match up with the wall anchor and stud pilot holes.  
  • Drill pilot holes in the furring strip, centered on the strip, at the designated marks.
  • Use your screwdriver to attach the furring strip to the wall.
    Note:  Verify level before moving on.  If this furring strip is not level, nothing else will be. 
Match the pine with the anchors and attach.
  • Repeat these steps to measure, two cut, and attach shorter pieces of 2" x 2" pine furring strip to the side walls.
    Note:  We butt-jointed two furring strips in each corner.  You could miter the corner joint if you want, but it is not necessary.
    Result:  You have created your shelf supports.
Detail of 2" x 2" supports under the shelf
  • If necessary, trim the melamine shelf to the desired depth and dry fit to verify your measurements.
    Note:  We cut our 12-inch deep board down to a depth of 8-inches using a circular saw.  
  • Measure one inch in from the back edge of the melamine shelf and drill pilot holes every 12-inches or so.
    Note: This is where you will attach the shelf to the 2" x 2" supports.  Ideally, the pilot holes will enable you to screw into the center of the furring strip.
  • If you want to add an electrical power strip to the shelf, this is the point at which you should drill a 1-2 inch hole into the corner of the shelf surface.
    Note:  You can drill the hole after the fact, but it will be much easier to do it now.
  • Use a screwdriver and screws to attach the shelf to the 2" x 2" supports.
  • Use caulk and trim paint to patch the exposed screw holes.
    Result:  The shelf is attached.  Time to trim it out so it looks more substantial and prettier.
We drilled a hole through which we pass the Dustbuster cord.
  • Cut a piece of case molding trim the length of the shelf.
    Note:  We used only one length of trim because our shelf spanned from wall to wall.  
Case molding
  • Nail case molding to the front of the melamine shelf using finishing nails.
  • Use caulk and trim paint to hide the nail marks and seal any gap along the wall.
    Result:  Now you are done!
Close up of the trim molding
  • Want to add the electrical power strip?  Use screws and metal clamps to attach the power strip to the bottom of the shelf.
    Note:  Our power strip is not very pretty.  However, no one is going to see it.
Electric power strip affixed to underside of shelf.
  • Plug in your dustbuster, clock, phone, etc. and set it/them on the shelf.
    Result:  You just optimized a normally unused space.  Congratulations.
This project was very straight-forward and inexpensive.  The shelf, furring strip and case molding cost us less than twenty dollars.  The project itself took just a couple of hours to complete (we had to wait for the paint to dry).  Not a bad investment for a shelf that adds so much more functionality to the room.
Check back with me for the next phase of our laundry room update.  I got right to work on tiling the backsplash around the sink.  And, since that tile looked so good, I decided to add tile to the wall behind this shelf too!
Over the Washer/Dryer shelf complete - moving on to Phase Four!