Tuesday, July 31, 2012

Updating a Backsplash Using Tile


This past weekend we added a tile backsplash to our basement bar.  The project came about when I casually asked my husband if he thought our tumbled Travertine tiles (a previous garage sale buy) were the right size to fit in our basement bar's narrow backsplash area.  Ever the good sport, he brought a few tiles out of storage so we could see.  We determined that they would fit perfectly, began discussing options and, before we knew it, were midway through another project.  Yes, it was a bit impulsive.  However, we already own tiling supplies, did not have any major plans for Saturday (aside from watching some Olympics action on T.V.), and the kids were off with friends.  So, we were able to dig right in.

We made just two trips to the home improvement store - for grout, a wider outlet cover, and 12" x 1" crown molding tile.  By Sunday afternoon, we had a beautiful backsplash and an updated bar area.    

Keep reading to see how we did it.

But, First, A Few Notes on Tiling Supplies:
How much Tile?
As I mentioned, we already had tile when we began this backsplash project, it was left over from the two boxes of 3" x 3" tumbled travertine tiles and one sheet of 1" x 3" travertine mosaic tiles at a garage sale earlier this year.  After completing a planter box cover project, we still had 1 1/2 boxes remaining.  So, the only tiles we needed to purchase for our project were three pieces of 12" x 1" travertine molding - used as a finishing touch.
To determine how much tile you will need for your specific project, measure the length and width of the area you want to cover.  Multiply length times width to determine square footage.  Most boxes of tile will specify how many square feet one box will cover.  Be sure to purchase ten to fifteen percent more tile than you need to account for those broken or damaged in transit or during the install process.

Adhesive Tile Setting Mat or Thin Set Mortar?
I've read many, many reviews of tile setting mat products - both good and bad.  A tile setting mat, while more expensive than traditional mortar, is a great choice for small, DIY projects.  It's mess-free to install and allows you to tile and grout immediately (no set up time).

This was our second time using the adhesive tile setting mat.  We've had great results and have never experienced the sagging, peeling and detaching tiles mentioned in negative product reviews.  Based on my research and personal experiences, I offer up the following suggestions to anyone choosing to use adhesive tile setting mats:
  • Properly clean the wall and backsplash surfaces before use.  
  • If you are applying to a wooden surface, or a surface previously painted using with high gloss paint, sand the surface before cleaning.
  • Remove any air bubbles after applying the mat and press the mat firmly with the grout float to adhere it to the surface before you remove the plastic covering.
  • Make sure the backs of the tile are clean and free of dust before applying to the mat.  
  • If using mosaic segments cut from a larger sheet of mosaic tile, be sure to trim the webbing material as close to the tile as possible. And, press the tiles in firmly with the grout float to adhere.
  • Grout within 24 hours of install.
As with any project, consider your specific tile application, do your research, and trust your gut.  If you have ANY doubts, go with the tried and true (though messier) thin set mortar.  As for me, I will absolutely continue to use an adhesive tile setting mat for small tiling jobs.

How to Tile a Backsplash

Materials:
  • Tile of your choice 
  • Adhesive tile setting mat or thin set mortar
  • Measuring Tape
  • Scissors
  • Level(s)
  • Tile Spacers
  • Premixed tile grout or grout mixture
  • Grout float
  • Trowel (optional)
  • Bucket
  • Sponge
  • Latex or rubber gloves
  • Tile Cutter or Tile Saw
  • Tile Nipper
  • Hacksaw and vice (for thick trim tile)
  • Painters tape and paper/drop cloth/plastic bags - to protect surfaces while grouting
  • Tile sealer
Some of the supplies needed for the job
General How To:
Design and Place Tile
  • Lay out the tiles, or dry fit the tiles, using tile spacers, to verify spacing and quantity of tiles needed.
    Note: This step is very important!  Pay attention to corners, electrical outlets, phone jacks, etc.
Work out design and placement challenges before attaching tile! 
  • Measure, cut and apply the tile setting mat according to manufacturer's directions.
Be sure the surface is clean and dust-free before adhering adhesive mat.
  • Place tiles on the adhesive.
    Note:  Place all the full-sized tiles first.  Then, measure, cut and place the partial tiles.
    Note:  We doubled up tile spacers along the bottom of the tiles, where they met the counter top. 
The first, whole tile placed flush to the backsplash edge.
Tile spacers ensure grout lines are consistent.
  • Measure and cut partial tiles as needed.
    Note:  We used a tile cutter, tile nippers and a hacksaw for various cuts on this project.
    Note:  This is the step at which you will appreciate purchasing extra tiles!
Tile cutter is great for straight cuts on wall tiles.
  • Place partial tiles to complete design.
    Note:  We pressed firmly on all tiles after double-checking the look.  The goal is firm adhesion to the tile setting mat.
Tiles are placed and ready for grout.
Result:  Design and tile placement done.  Or is it?
This is the point at which I thought we were stopping.  And I was happy with the design - straightforward, clean, single run of tile.  Of course, then my husband presented me with the single, 12" x 12" sheet of travertine mosaic.  I forgot we had that.  Hmm...
Travertine mosaic?  Yes, please!
This changed everything.  We still had a few sheets of tile setting mat left, which meant we could add mosaic tile to the backsplash.  We played around with the placement and decided that a triple run of mosaic would meet up with the wall just above the bar counter.  Hmm...
Playing around with placement to add to the design.
The mosaic looked so good, we thought we'd add two more rows of square tiles.  This would bring the tile just to the floating shelf.  Hmm...

Note:  Because the tile now goes around a light switch and outlet, we trimmed tile with tile nippers.  Take a look at Tiletools.com for tips on when and how to best use tile nippers.

Tile nippers are good for 'nipping' small pieces off a tile.
Fifteen to twenty minutes of nipping later, we had the tile nicely placed around the outlet and light switch.  Now, how to finish things off?  We opted to add a single run of mosaic, followed by a run of 12" x 1" crown molding.  This brought the tile to just under the intercom speaker.
Note:  We cut two pieces of the12" x 1" crown  molding tile - one for each side of the floating shelf.  The crown molding tile was too thick for the tile cutter, so we held it steady in a table vice and used a hacksaw.  It was the perfect solution for the cut.
A table vice holds tile in place while cutting with hacksaw.
Result:  Tile design and placement done.  Phew.
Except it still was not quite done.  Upon review, the tile seemed a bit awkward around the floating shelf.  We had not intended to move the shelf, but now, we realized it had to happen.
Still not quite right.
So, we moved the floating shelf up approximately six inches, making room for a solid run of both the mosaic and finishing molding.  If we're going this far, we may as well do a complete job.  What a great decision.  It looked much better!
Final backsplash placement.
Result:  Now the tile design and placement is complete.  Bring on the grout!

Grout Tile

  • Protect the area using paper, drop cloth, etc.

Prep area before applying grout.

  • Inspect all joints to make sure they are clean and free of debris.
  • Prepare grout.
    Note:  We used premixed grout, rather than powdered grout, for this small project.  To learn more about choosing a grout, applying grout, and caring for grout, check out the great information on How To Do Things
  • Apply grout with a grout float and, if needed, a trowel.  Work grout completely into the joints.
    Note:  Use the edge of the grout float to gently scrape grout off the tile faces as you go, being careful to not gouge the joints.

Wear plastic gloves - grouting can get messy. 

  • Allow grout to set up, or cure.  Refer to manufacturer's recommendations.  
  • Dampen a sponge in clean water and gently wipe tile surface in a circular motion to clean.
    Note:  Rinse the sponge and change water often.   We changed water three times for this project.   

A large sponge with rounded edges works best when grouting.
  • Gently run the sponge along all grout lines to shape the lines as desired.
    Note:  Most pros shape the grout lines just a scant amount below the tile surface, while leaving the tile edges still covered.
  • Allow the grout to cure completely.
  • Use a dry, soft cloth to buff the tile surface and remove any residual haze.
    Note:  After a couple of days, we'll seal the grout lines to protect it from spills, stains, etc. 
Grouting complete!
  • Reattach the electrical outlet plates/switch covers, adjusting the outlet and/or switch forward as necessary.
    Note:  We purchased a slightly larger switch cover to cover up grout lines.  Luckily, switch covers are very inexpensive.
    Note:  We also rehung our floating shelf at this point.
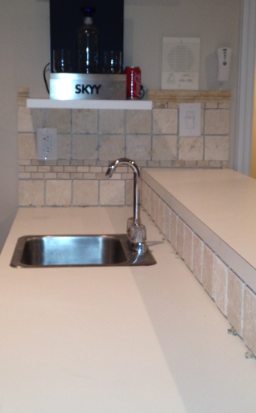
    Result:  You're done!  Stand back and behold the beautifully completed backsplash!

Project backsplash complete!
Nice transformation.
We love our new backsplash!  This project proved to be low cost and high impact - just our style.  

An Added Bonus:
When we added the final design alteration in the basement, we were left with odd pieces of the 12" x 1" molding tile.  This was not wasted.  We used it to embellish our kitchen backsplash, which features the same tumbled Travertine tiles.  Take a look below:
Kitchen backsplash before...
And, after.
I have a feeling that we'll be tiling again soon.  As I mentioned at the beginning of this post, we've already discussed the possibility of adding larger tiles to the lower wall behind the bar, creating a chair rail and continuing the backsplash design along the length of the wall.  

Hmm...you better stay tuned.

Friday, July 27, 2012

Updating Drapes - It's the Little Things

Before and After
It's the little things in life that can make the biggest difference.  Take, for example, my dining room curtains.  Or drapes, or window coverings.  Or whatever!  
Do you know the difference between a curtain and a drape?  I did not know until this past week.  I've interchanged the terms for years until I read this online article.  Based on the definitions it provides, I have drapes.  Who knew?

Update One: Rope Trim Tieback
When we moved into our house, two single drapery panels hung from a wooden rod and seemed 'sparse' and slightly unfinished.  I added a simple, cream colored rope trim to each drapery panel (previously used in my SAV house) as a tieback soon after we moved in.  I assumed I would change out the drapes someday and did not really put much additional thought into the matter.  After all, we do not really spend much time in the formal dining room.  
Re-purposed rope trim tiebacks are held in place with cup hooks. 
Update Two:  Lengthen with Drapery Clip Rings
The rope trim tiebacks helped.  Still, every time I walked through the dining room, I thought, "Those things are just a bit too short against the white wall."  That thought became a little tic in my brain every single time I saw the drapes.    So, the next improvement I made was to bring the length of the drapes down a couple of inches using drapery clip rings.  The drapes now brush the floor so the white wall paint no longer shows.  What a huge difference that one little (and inexpensive) alteration made!
Adding clip rings lengthened panels - they now barely brush the floor.
Update Three:  Sew Coordinating Fabric Tiebacks (Tutorial follows)
When I updated the wall art in my dining room a couple weeks ago, the draperies once again caught my critical eye. The tones of the drapery fabric did not contrast enough with the wall's paint color, making it look bland.  So, I began scouring the Internet for ideas on how to add some visual contrast.  Houzz and Pinterest are currently my favorite sites for inspiration.  Along with real estate sites, such as Zillow and Realtor.

Ultimately, I decided that I loved the graphic, black-and-white pattern of my wall art fabric so much, I wanted to incorporate the pattern onto the window wall.  Looking at the tablecloth's packaging material sealed the deal for me.   It looked just like a tieback.  Holding it up to the draperies, I knew it would work.
Tablecloth packaging looks just like a drapery tieback! 
I decided to use what was left of my fabric napkins to make drapery tie-backs.  This quick project would not only carry the graphic black-and-white pattern to another wall in the room, but it would also jazz up my otherwise boring drapes. 
Curtain tie-back before and after
Many tutorials exist online for learning how to make drapery tiebacks.  An obvious tutorial I checked was eHow.com.  While browsing Pinterest, I found another great tutorial on the  blogger, Homemade Ginger's, site.

As usual, I read through several tutorials and watched a few videos before coming up with my own method of creating the tiebacks.  This was a re-purposing project that used up scrap material.  Luckily I had enough fabric scrap from my wall art project to create two tiebacks.  I did not need to purchase additional napkins.  If you are considering using scrap material as well, read this link to learn more about industry standards on tieback lengths. 
Now, keep reading to see how I made my simple tiebacks:

Materials:

  • Fabric - in my case I used the remaining 6" x 20" fabric from the napkins used for wall art.
  • Iron and ironing board
  • Pencil
  • Tape Measure or quilting ruler
  • Scissors or Rotary Cutter
  • sewing machine and supplies
General How-To:

  • Measure and cut fabric to length.  Iron to remove any wrinkles.
    Note:  I started with an L-shaped piece of scrap fabric.  I cut it at the corner using a 45-degree angle and then sewed the pieces together on the bias to create a long rectangle approximately 6" x 38."  Yes, I left the original hem - I did not want to waste any width.  

Fabric scraps joined to create proper length.

  • Match the fabric, right-sides together, and pin into place.  
  • Sew fabric in place, along two sides, removing pins as you go.
    Note:  Leave one short side open.

Sew fabric to form a long tube.

  • Turn fabric right-side out, straightening as necessary.
  • Use scrap material to create a loop for the drapery tieback.
    Note:  You can also use an elastic hairband, plastic ring, small length of ribbon, etc.  I cut a small piece off the end of each tieback and sewed it into a loop for a more uniform look.  Truly, this project used every last bit of the original napkins! 

Sew loops for tieback using scrap fabric.

  • Iron each fabric tube flat, folding the open end in about 1/2" and inserting one of the small fabric loops.  Pin into place.

Insert the loop into the open end of tieback.

  • Top stitch around the entire tieback, closing the open end and securing the loop.  Remove pins as you go.
    Note:  Because I only made one loop per tieback, I folded each tieback in half and sewed it together at the short end to create a large loop.  An alternative method would be to sew the open end closed and then sandwich the loop between the two short ends and stitch to secure.  Or, to create two loops per tie back.   My method worked pretty well for a first attempt.

Attach loops to tiebacks

  • Install the tiebacks and your'e done!  Stand back and reflect on how a little (and zero-cost) thing can make such a big difference.
Draperies with newly installed tiebacks
Drapery tiebacks coordinate with the wall art.


I like this tieback look so much more than the previous rope trim.  The project took about one hour and cost zero dollars.  Very simple to do, and priced right.  If and when we opt for update or new draperies, I will not hesitate to make a new set of tiebacks using the skills I just learned.    It's the little things...

Thursday, July 26, 2012

An Easy Marinade Recipe: 3-3-2-1 And Done!

I always separate bulk meats, purchased from the grocery store or warehouse club, into 1-2 pound packs, label them, and store them in the freezer. Some packs are stored in marinade, which makes future meal preparation even easier.

When I prepare marinades, I use the same basic recipe - I just switch up the seasoning mix based on the flavor profile.  I remember the marinade recipe as 3-3-2-1, which refers to the proportions of the four main ingredients.  Three parts seasoning; three parts oil; two parts soy; one part vinegar.  This combination makes a really great marinade!


Keep reading to learn how to create the basic 3-3-2-1 Marinade combo for one pound of meat.   


Making a Marinade
Marinade Ingredients
Ingredients:
3 Parts Seasoning Mix
3 Parts Oil
2 Parts Soy Sauce (or Bragg's Liquid Aminos)
1 Part Apple Cider Vinegar

Tips and Hints:

  • For each one pound of meat, I use 3 tablespoons seasoning mix, 3 tablespoons oil, 2 tablespoons Bragg's and 1 tablespoon cider vinegar.
  • The picture above shows a Store Brand spice blend.  I've used a variety of spice mixes over the years:  those I've created from scratch, purchased from specialty shops, grocery stores, Farmer's Markets, etc.  In this recipe, you can use whatever mix you desire - just be sure to use 3 parts worth.
  • I use Bragg's Liquid Aminos, rather than soy sauce, for all my cooking- it contains less sodium. 
  • Any Oil will do.  I was raised in an Italian household, so I always use Extra Virgin Olive Oil with my marinades.  If you prefer Canola Oil, that works well too.
  • Feel free to add marinade ingredients directly to the zipper-sealed bag.  It saves some cleaning.
  • Let the meat sit in the marinade for at least one hour before cooking.  You can store it overnight in the refrigerator, or freeze for future use.  

Add the ingredients directly to a storage bag to  reduce mess. 
Massage the marinade into the meat; seal the bag tight and label  before storing.
Grilled Jamaican Jerk Flank Steak.  Yum!
Super easy, super yummy.  Every time.  Try the marinade recipe soon and let me know how you like it!

Wednesday, July 11, 2012

Updating Framed Art

Several years ago, we purchased two, coordinating art pieces from a home decorating store.  The artwork was priced right and went well in the dining/living room - the black frames and silver mats picked up on the other accents in the room, and the scene was reminiscent of my beloved marsh.  After a year or so, I began to feel the muted tones and intentional fuzziness of the picture were depressing.  I took the prints down, stashed them in a closet, and replaced them with metal, sculptural wall art.

As we unpacked and decorated our new house, I rediscovered the prints.  Short on art and heavy on walls, I tried the old prints in the new dining room.  New house, new walls, new vibe, right?  I still liked the frame and mat, but the pictures continued to remind me of trying to see through the windshield during a foggy rainstorm (oddly, this is a recurring nightmare of mine).  The prints also seemed too traditional for what I wanted the room to feel like.  I had to make a change.  Determined not to pay retail for more generic art, I looked for inspiration everywhere - art fairs, thrift shops, estate sales, etc.

This past week, I found my inspiration in this tablecloth:


Inspiration for new wall art
The fun, whimsical, yet sophisticated art on this Merimekko tablecloth made me smile as soon as I spied it.  In the store, the tablecloth fabric was stretched over a canvas and hung on the wall as art.  The motif reminded me of a decorative platter I already have in my dining room, and speaks to the framed, black-and-white sketch art in my living room.  I bought a tablecloth and three napkins and headed home.


Originally, I figured I would cut up the tablecloth and staple it to stretcher frames.  Ultimately, I decided to use the tablecloth as designed (on the table) and frame two of the napkins instead.   Keep reading to learn how to I did it:


How To Update Artwork from Framed Print to Framed Fabric:


Materials:
  • Fabric - in my case, I used a 20" x 20" napkin for each frame
  • Iron and ironing board
  • Pencil
  • Tape Measure or Ruler
  • Scissors
  • Tape
  • Framed Print
General How-To:

  • Iron the fabric.

Napkin before ironing

  • Place the framed art on a large work surface, front-side down and carefully slit the paper backing on three sides using scissors.Note:  I worked on the dining room floor.

Slit paper backing on three sides.

  • Peel the paper backing.
    Note:  You should notice small metal tabs hold artwork in place.

Peel paper back to reveal metal tabs.

  • Bend back the metal tabs, and remove artwork.
    Note:  Leave the glass in the frame and clean it is necessary.

Remove artwork, but leave glass in place.

  • Gently pull mat free from print.
    Note:  In my case, the mat was attached using double-sided tape.  Be very careful to not bend or damage the mat.

Separate mat from artwork.

  • Run the mat over your fabric (napkin) until you determine the desired arrangement.  Mark with a pencil and cut fabric to desired size using scissors or a rotary cutter.
    Note:  I cut a 13" x 13" square of fabric, which left a 1/2 " selvage on all sides.
  • Tape fabric to mat on back side.
    Note:  Pull fabric taut before you apply tape.  Depending on the fabric weight, you may want to use duct tape.

Cut fabric to size and tape to back of mat.

  • Place mat back in frame and top with flipped over artwork.  Press metal tabs down to hold everything in place.
    Note:  Placing artwork back in the frame strengthens everything.  I flipped mine because the white backing of my artwork is white - it will not bleed through the white fabric.  Adjust according to your specific artwork/fabric combination.

Place artwork back in frame, front side facing back.

  • Fold paper backing back over your work and tape.

Tape paper backing to secure

  • You're done!  Hang back on the wall and admire your work.

New Artwork
I love how this simple update brings a smile to my face every time I walk through the room.  I cannot believe I did not update those frames sooner - it was such an easy project.  I had the frames on hand and spent less than twenty dollars on the napkins.  When my tastes change (and they will), I can easily update the frames again.

Want to try this, but don't have a piece of artwork you need to change out?  Garage sales and thrift shops are full of gently used  frames/artwork.  If the artwork is not your taste, but the frame is in good shape, buy it and change out the art!  Or, just pick up a new frame at a craft shop and frame away!