|
| Updated Powder Room |
Like most things in our 20-something year old home, the powder room fixtures were original. While they functioned well enough, the ornate brass finishes needed refreshing. We knew we wanted to update sooner than later. So, while I agreed to live with the pedestal sink until a better solution presented itself, I insisted we update the fixtures. We also addressed the lack of storage in the powder room. Keep reading to see how we updated the powder room - keeping form, function, and budget in mind.
Fixtures:
Pretty soon after settling in, we updated the the following powder room fixtures:
- Faucet
- Towel Ring
- Vanity Lighting
- Mirror
- Toilet Trip Lever / Seat
- Toilet Paper Holder
- Door Hardware
Faucet: For consistency throughout the house, we chose a faucet with a satin nickel finish. We measured to confirm the fixture fit the pedestal sink's pre-drilled, 8-inch
widespread faucet holes. Before heading out to the store, I snapped a picture of the vanity specifications. I referred to it a few times as I perused the huge
wall-o-faucets at the home improvement store.
Note: Read more about faucet sizes on
Dimensions Info's web site.
 |
| Replaced brass faucet with updated, satin nickel faucet |
Towel Ring: Bathroom fixtures are pretty straightforward. The small-scaled nature of powder rooms, however, always seems to invite a debate regarding hand towel placement. Should we hang the towel on a bar, ring, or hook? Or should it just sit on the counter?
Because our powder room featured a pedestal sink and existing towel ring, the debate ended pretty quickly. We sent the brass-finished, open-rectangle towel ring to the local charity donation center and replaced it with a towel ring in a satin nickel finish. Lucky us, we hit a clearance sale and paid less than ten dollars for the towel ring.
 |
| Hand towel hangs from towel ring |
Vanity Lighting and Mirror: In the past, we've saved renovation dollars by updating existing mirror frames and light fixtures with spray paint. This time around, we agreed that the ornate molding on the mirror was just not our taste, so we left it
as is and donated it. The light fixture met the same fate.
 |
| Original bathroom decor on way to donation center drop-off |
We purchased new lighting and a mirror at the home improvement store. Because we used the existing wiring, the vanity light installation went smoothly.
Note: Take a look at my post from our
basement bathroom update to learn more about installing a vanity light where one does not already exist.
 |
| New mirror and vanity light installed |
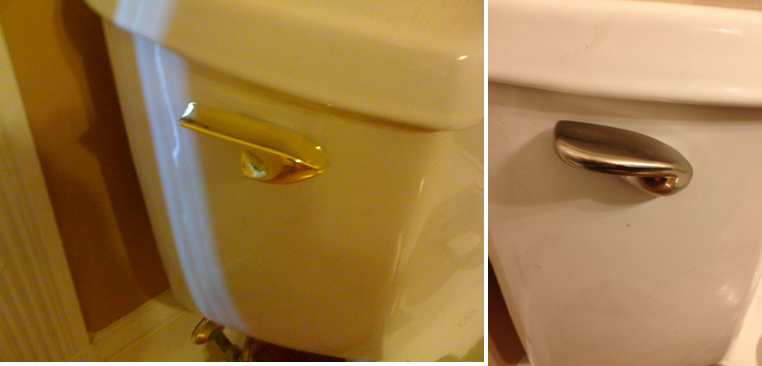
Toilet Seat / Trip Lever: Replacing the toilet seat is a no-brainer for new homeowners. And, yes, we replaced the toilet flusher as well. Officially known as the
trip lever, this is one of the main functional features in a bathroom. We felt the shiny brass had to go. I chose a satin nickel trip lever from the plumbing aisle, and my husband installed it in less than 15 minutes.
Note: Refer to
this video, by Plumbing Supply Group, to learn how you can easily update your trip lever too.
 |
| Brass trip lever replaced with satin nickel version |
Toilet Paper Holder: While we were addressing that portion of the powder room, we shopped for a new toilet paper (TP) holder. Man, those things can be costly! Since one rarely handles the actual holder, we opted to reuse the existing holder and spray it in a nickel finish. This is a very budget-friendly solution. We already had the spray paint, so it cost us nothing.
 |
| Two coats of metallic finish spray paint updated the TP roll holder. |
Door Hardware: Finally, we inspected the door knobs, stops, and hinges. These are subtle details in a room that, when updated, make a huge difference.
Door Knobs: We like levers more than knobs. So, we replaced the brass knob with a satin nickel door lever. Whichever style you prefer, make sure it is consistent throughout your house. To keep the costs in check, we are going rooom-by-room, updating the door hardware each time we update a specific room.
Door Stop:
Door stops are equally significant to the overall look of room. Baseboard stops, wall stops and hinge-pin stops are all designed to stop a door knob from slamming into the wall. The
hinge-pin door stop was in fine condition, so we just left it as is.
Door Hinges: Most interior doors are installed with brass or silver-colored door hinges. By the time a home is 20+ years old, a large number of these door hinges are mismatched and sprinkled with paint stains. Why? Because few home owners think to replace hinges when updating door knobs to a different finish, such as nickel or oil-rubbed bronze. Likewise, few homeowners tape over hinges when prepping trim for paint.
Hinges may seem insignificant, but they really do tell a lot about the house. We inspected the hinges and found some paint spatters. I removed these paint spatters with a Q-tip soaked in paint thinner.
Note: If the hinges were brass, I would have removed them and used spray paint (like the TP holder). You can also replace them with new hinges in a coordinating finish.
 |
| Powder Room door hardware |
Phew. The brass was officially banished:
 |
| Powder room with updated fixtures |
Now to address the obvious lack of storage. This was my first pedestal sink and, while I didn't mind the look, I was not sure how to cost-effectively and attractively store all our stuff.
Storage:
For the first few months, we used a
plastic, three-drawer rolling cart to store necessities. While this solution was functional, it was absolutely not fashionable. At all. I cringed whenever a guest used the powder room. I was hesitant to purchase a stock vanity and my husband was hesitant to begin a big plumbing project. So, we made do. Finally, we found our inspiration at moving sale. the homeowners were selling a pair of Ikea nightstands. Hmm...
 |
| Ikea Hemnes nightstand with door |
They would certainly hold the items we wanted to store. And, they seemed narrow enough to fit alongside the pedestal sink. The color and price was right (we got the pair of nightstands for only twenty dollars), so we brought them home.
Once in place, we realized the doors both swung open from the left. This was easily remedied by switching the door hinge on one of the cabinets and flipping the door around:
 |
| The hinge was originally attached on the left-side... |
 |
| So we flipped the door and attached it to the right-side. |
I placed some bamboo place mats on top, to protect the finish, filled them and went about my business.
|
| Cabinets placed in powder room |
After we hung up some art work, and a cabinet behind the toilet, the powder room was officially updated. We had tons of function in a more updated fashion. The project, which we completed a few months after moving in, was low-cost and high impact - just how we like it.
We've lived with the powder room storage for a long time, and the storage solution has been wonderful. Over time, though, the place mats have taken a beating. Last weekend, I came up with a more durable (yet stylish) solution. Check back with me and I'll share it with you!