Like most things in life, however, even this roomy pantry was not perfect. Both my husband and I hoped to change the shelves around at some point to make the space more functional. We looked at favorite design websites, sketched plans, shopped organizational products and discussed ideas. But for almost two years, we could not decide on the best approach. Frankly, we knew it would be another large, potentially costly time commitment and we had other priorities.
Over time, the shelving seemed saggier and I began to loathe looking in the pantry. What bugged me so much, you ask? The list below describes a few of the bigger issues I had with my pantry:
- Shelf Material: The pantry shelves dipped, sagged and bent after twenty+ years of storing too-heavy items. (Or, maybe it was from years of kids trying to reach the high up shelf where the sweets were hidden?) The end mounting brackets on a couple of the shelves were even pulling away from the wall. I took to storing smaller cans and boxes in bins so they would not tip over.
 |
| After years of holding heavy items, the shelves were permanently bent... |
 |
| and the end brackets were pulling away from wall. |
- Shelf Placement: The pantry boasts a 10-foot ceiling. While the pantry shelves were certainly deep enough and provided clearance for tall containers, the lowest shelf did not clear my recycling and dog food bins. This meant the bins sat in front of the shelves and ate up valuable floor space. This made it harder to reach the back of the shelves and less convenient to store a step ladder in there.
 |
| Bottom shelf hangs about 3-inches too low. |
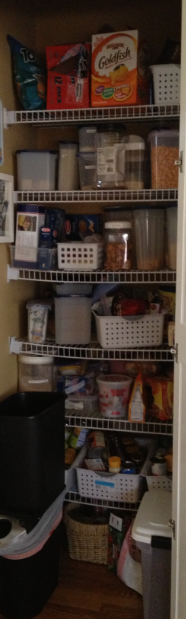 |
| Lots of under-utilized storage space! |
It was time for a pantry intervention. I sat down with my husband, presented my case, and began to measure and draw what would become my new pantry. My dream pantry would meet the following criteria:
- Is made from a solid shelving surface - not wire mesh shelving
- Spans from wall to wall and wrap around one side
- Clears the top of the recycling bin and dog food holder
- Provides ample room to stack items or store larger items.
- Optimizes the unused vertical space
About Pantry Shelf Dimensions
I did a lot of research on how to best space my shelves. And, most importantly, I measured the containers that we would be storing to make sure the guidelines I learned about were applicable to our specific needs.
Here is what some experts say you should strive for as far as pantry shelves are concerned:
- Depth: Between 14"-16"
- Height: 16"-18" (bulk storage) ; 12"-14" (general storage) ; (6"-8" (smaller cans).
And here is what we chose to do:
- Depth: The main shelf depth is 16", and the portion of the shelf along the side wall is 8" deep. This enables us to still step into the pantry, while adding about 10-12 square foot of storage. The depth on the highest shelf is 12". This enables us to reach the contents at the back of the shelf.
- Height: The permanent shelves are varying heights. For example, the span between the floor and the first shelf is 24". It allows us to stow the recycling and dog food bins under the shelf and leaves a little bit of wiggle room. Two of the shelves have 18" clearance, which accommodates larger canisters or bottles and a non-permanent shelf for canned goods. Three other shelves have 14" clearance, which works very well for standard storage.
The bottom line is this: Be sure your pantry can accommodate the items you need to store! Otherwise, you will be miserable.
About Shelving Materials:
For this project, we used MDF. It's inexpensive (we needed to build six shelves), takes to paint really well, and provides a custom look. My husband has built plenty of similar projects, from desks, shelves, etc. So, as long as he was willing to spend the time building from scratch, it was fine by me.
For more information on shelving choices, check out my blog post: Create a Tiered Multi-Bin Toy Storage Organizer.
And, to see how we used melamine for a similar shelving project, check out this blog post: Laundry Room Update: Over the Washer/Dryer Shelf.
Having agreed on a plan of action, we brought our supply list to the home improvement store and bought the makings of a new pantry. Bye-bye wire mesh shelves and underutilized storage space!
 |
| Pantry shelves - in the raw |
How to Optimize a Pantry
Materials:

How My Shelves Stack Up (based on the labels in the picture below):
I have six stationary shelves, just like before. However, The placement of the shelves enables me to fully optimize the pantry. After I restocked, I was amazed at how much free room I had left.

Materials:
- Medium-density Fiberboard (MDF) - We bought 2 3/4" thick boards of MDF that were approximately 8' x 4'.
- 2" x 2" Pine furring strip, long enough to create a cleat underneath the back and sides of your shelf
- Decorative Case Molding - To finish off the fronts of the shelves
- Drywall screws and anchors
- Pencil or Pen
- Measuring Tape or Ruler
- Stud Finder
- Laser Level
- Miter Saw
- Jig Saw
- Circular Saw
- Drill and Drill Bits
- Screwdriver
- Hammer
- Finishing nails
- Caulk
- Paint and paint supplies
- Clear out the pantry and remove existing shelving.
Note: Luckily, we had no major entertaining plans for the weekend - we stored the pantry contents in the dining room.
 |
| Our dog was quite curious about the mess |
- Determine dimensions and placement of the shelving.
Note: For our situation, we determined we wantedvsix L-shaped shelves that spanned 16" x 29" across the back of the shelf and spanned an additional 8" x 18" along the left-side of the pantry. - Use a measuring tape and pencil to transfer your measurements to the MDF.
Note: Make sure your lines are straight and level. - Use a jig saw or circular saw to cut out the shelf.
Note: MDF produces a lot of dust when cut. Work in a well-ventilated area and use a dust mask/protective eye protection.
 |
| Straight lines=straight cuts. |
 |
| Drill pilot holes to help you cut corners with a jig saw. |
- Dry fit the shelf in the pantry to verify the cuts.
Note: Our walls are not plumb, so we trimmed and planed each shelf to fit the wall.
 |
| Dry fit: round three. Gotta love wonky walls. |
- Use the first cut shelf as a template when measuring the subsequent shelves.
Note: We were able to get three shelves from each sheet of MDF.
 |
| Cut shelves, awaiting paint. |
- Measure and cut the furring strips.
Note: Each shelf needed support on three sides: Along the back wall and each side wall. We cut the furring strips using a miter saw.
 |
| Furring Strips, lined up and ready for paint. |
- Apply two coats of paint to the shelves and strips to match your shelf color.
Note: We painted both sides of each shelf, but only the two visible sides of the furring strips.
 |
| Waiting for paint to dry. |
- Prep your pantry walls for paint.
Note: For us, this step involved a whole lot of Spackle. It also involved a trip to the paint store.
 |
| Spackle applied to all holes. |
- Paint the pantry walls.
Note: We chose to reuse the existing wall color (Empire Gold by Sherwin Williams), which was used in the rest of the kitchen. I did not have any paint remnants, but was certain I knew what color the previous homeowner used (I had to match my laundry room walls last summer.) I compared a paint-spattered end bracket to the color swatch, verified it at the paint store and bought a quart of latex paint in matte finish. It was a perfect match. Phew.

- Using your space plan, a tape measure and pencil, measure and mark the walls in the pantry for the new shelves.
Note: You will be attaching the furring strip flush with this mark. The actual shelf surface will be about 3/4" above the 2" x 2". - Mark a spot every 12-inches or so along the marked line. Use a stud finder to locate studs.
Note: Since most wall studs are 16" on center, you must use a combination of drywall screws and regular screws with wall anchors. The stud finder will also help locate duct work, plumbing, electrical, etc. that is in the walls. - Drill pilot holes and insert wall anchors as necessary.
- Dry fit your furring strip and mark the spots for the screws.
Note: These marks should match up with the wall anchor and stud pilot holes. - Drill pilot holes in the furring strip, centered on the strip, at the designated marks.
- Use your screwdriver to attach the furring strip to the wall.
Note: Verify level before moving on. If this furring strip is not level, nothing else will be.
Result: You have created your shelf supports. The picture below shows most of the supports installed.
 |
| Install the furring strips. |
- Measure one inch in from the back edge of each shelf and drill pilot holes every 12-inches or so.
Note: This is where you will attach the shelf to the 2" x 2" supports. Ideally, the pilot holes will enable you to screw into the center of the furring strip. - Use a screwdriver and screws to attach each shelf to the corresponding 2" x 2" supports.
Note: At this point, we realized that the highest shelf should be a bit shallower, so I could reach items up there. We adjusted it from 16" deep to 12" deep.
 |
| Installing shelves. |
- Use caulk to patch the exposed screw holes.
Result: The shelf is attached. Time to trim it out so it looks more substantial and prettier.
 |
| Caulk covers the spot where we attached the support. |
- Cut case molding trim to fit the three edges of the shelf.
Note: We had both an inside corner and an outside corner to accommodate for our shelves. We used a miter saw to cut the molding. - Nail case molding to the fronts of the shelving using finishing nails.
 |
| Use a nail set to countersink the nails and putty to cover them. |
- Use wood putty to fill in the nail holes and any gaps where the case molding meets in the corners. Use caulk to fill in where the shelf and shelf support meet the wall. Use touch up paint to hide your work for a seamless finish.
 |
| Puttying, caulking, and painting finishes the job. |
- Stand back and admire your work.
Result: You just optimized your pantry storage. Congratulations!
 |
| So pretty! |
- Lay down some shelf liner and reload your pantry items.
Result: Your project is complete.
How My Shelves Stack Up (based on the labels in the picture below):
I have six stationary shelves, just like before. However, The placement of the shelves enables me to fully optimize the pantry. After I restocked, I was amazed at how much free room I had left.

- Area 1: 17" span to the ceiling. The highest shelf stores bulky, extra items I used to store in other spaces, such as my K-Cups and paper plates.
 |
| Going vertical with storage! |
- Area 2, 4 and 5: 14" shelf height: These two shelves are for general storage.
 |
| 14" shelves work great for my pastas and grains |
 |
| The 8" side shelves store smaller containers. |
- Area 3 and 6: 18" shelf height: The higher shelf is where I keep my flours/sugars/etc. And, the lower shelf is for canned and jarred goods. I decided to purchase a 31" closet shelf to optimize my canned goods storage on the lower shelf.
 |
| Canned goods all organized - I know what I have on hand at all times. |
- Area 7: 25" span to floor: I can finally stow recycling and dog food underneath.
 |
| Large bins stow beneath the shelf, with room to spare. |
Final Touches:
Plastic Storage Containers: Whether you invest in Tupperware or buy Snapware at the grocery store, storing your grains, cereals and snacks in plastic containers, rather than the manufacturer's packaging, is just good sense. It keeps clutter at a minimum and, if you choose clear containers, helps you keep on top of inventory. I already had many of my containers, but I did spend a little bit of time re-allocating some of the content.
Step Ladder: I bought a new, Rubbermaid 3-step Ultralight stepstool to help me reach the top shelf. I chose one that is made of aluminum so it's super light! It folds up and stands on the right wall, clearing both the light switch and the shelf. Perfect.
 So, there it is! My new and improved pantry. Over the course of one weekend, we staged an intervention that got rid of months of stress caused by a dysfunctional use of space. We spent less than two hundred dollars for everything. What a transformation:
 It's been several weeks since we completed this project and I could not be more pleased with the results. We all have a far easier time finding things. I love having the extra shelf space. And, the kids love the step ladder (of course). All in all, another great project.
Do you have a pantry in need of an intervention? Hopefully, I gave you a few good ideas!
Plastic Storage Containers: Whether you invest in Tupperware or buy Snapware at the grocery store, storing your grains, cereals and snacks in plastic containers, rather than the manufacturer's packaging, is just good sense. It keeps clutter at a minimum and, if you choose clear containers, helps you keep on top of inventory. I already had many of my containers, but I did spend a little bit of time re-allocating some of the content.
 |
| Plastic storage containers keep things organized. |


Do you have a pantry in need of an intervention? Hopefully, I gave you a few good ideas!